#why Javascript Static Initialization Blocks
Explore tagged Tumblr posts
Visit Tumblr Blog
Explore Tumblr blogs with no restrictions, modern design and the best experience.
Last Seen Tumblr Blogs


Fun Fact
US Tumblr user growth rate is estimated to slow down to 4.1%.
Text
Master JavaScript: Step-by-Step Tutorial for Building Interactive Websites
JavaScript Tutorial

Master JavaScript: Step-by-Step Tutorial for Building Interactive Websites
In the evolving world of web development, JavaScript remains one of the most powerful and essential programming languages. Whether you're building simple webpages or full-fledged web applications, JavaScript gives life to your content by making it interactive and dynamic. This JavaScript Tutorial offers a beginner-friendly, step-by-step guide to help you understand core concepts and begin creating responsive and engaging websites.
What is JavaScript?
JavaScript is a lightweight, high-level scripting language primarily used to create dynamic and interactive content on the web. While HTML structures the webpage and CSS styles it, JavaScript adds interactivity—like handling clicks, updating content without refreshing, validating forms, or creating animations.
Initially developed for client-side scripting, JavaScript has evolved significantly. With the rise of environments like Node.js, it is now also used for server-side programming, making JavaScript a full-stack development language.
Why Learn JavaScript?
If you're looking to become a front-end developer or build web-based applications, JavaScript is a must-have skill. Here’s why:
It runs on all modern browsers without the need for plugins.
It’s easy to learn but incredibly powerful.
It works seamlessly with HTML and CSS.
It powers popular frameworks like React, Angular, and Vue.js.
It’s in high demand across the tech industry.
This JavaScript Tutorial is your gateway to understanding this versatile language and using it effectively in your web projects.
Getting Started: What You Need
To start coding in JavaScript, all you need is:
A modern browser (like Chrome or Firefox)
A text editor (such as Visual Studio Code or Sublime Text)
Basic knowledge of HTML and CSS
No complex setups—just open your browser and you're ready to go!
Step 1: Your First JavaScript Code
JavaScript code can be embedded directly into HTML using the <script> tag.
Example:<!DOCTYPE html> <html> <head> <title>JavaScript Demo</title> </head> <body> <h1 id="demo">Hello, World!</h1> <button onclick="changeText()">Click Me</button> <script> function changeText() { document.getElementById("demo").innerHTML = "You clicked the button!"; } </script> </body> </html>
Explanation:
The onclick event triggers the changeText() function.
document.getElementById() accesses the element with the ID demo.
.innerHTML changes the content of that element.
This simple example showcases how JavaScript can make a static HTML page interactive.
Step 2: Variables and Data Types
JavaScript uses let, const, and var to declare variables.
Example:let name = "Alice"; const age = 25; var isStudent = true;
Common data types include:
Strings
Numbers
Booleans
Arrays
Objects
Null and Undefined
Step 3: Conditional Statements
JavaScript allows decision-making using if, else, and switch.let age = 20; if (age >= 18) { console.log("You are an adult."); } else { console.log("You are a minor."); }
Step 4: Loops
Use loops to execute code repeatedly.for (let i = 0; i < 5; i++) { console.log("Iteration:", i); }
Other types include while and do...while.
Step 5: Functions
Functions are reusable blocks of code.function greet(name) { return "Hello, " + name + "!"; } console.log(greet("Alice")); // Output: Hello, Alice!
Functions can also be anonymous or arrow functions:const greet = (name) => "Hello, " + name;
Step 6: Working with the DOM
The Document Object Model (DOM) allows you to access and manipulate HTML elements using JavaScript.
Example: Change element style:document.getElementById("demo").style.color = "red";
You can add, remove, or change elements dynamically, enhancing user interaction.
Step 7: Event Handling
JavaScript can respond to user actions like clicks, keyboard input, or mouse movements.
Example:document.getElementById("myBtn").addEventListener("click", function() { alert("Button clicked!"); });
Step 8: Arrays and Objects
Arrays store multiple values:let fruits = ["Apple", "Banana", "Mango"];
Objects store key-value pairs:let person = { name: "Alice", age: 25, isStudent: true };
Real-World Applications of JavaScript
Now that you have a basic grasp, let’s explore how JavaScript is used in real-life projects. The applications of JavaScript are vast:
Interactive Websites: Menus, image sliders, form validation, and dynamic content updates.
Single-Page Applications (SPAs): Tools like React and Vue enable dynamic user experiences without page reloads.
Web Servers and APIs: Node.js allows JavaScript to run on servers and build backend services.
Game Development: Simple 2D/3D browser games using HTML5 Canvas and libraries like Phaser.js.
Mobile and Desktop Apps: Frameworks like React Native and Electron use JavaScript for cross-platform app development.
Conclusion
Through this JavaScript Tutorial, you’ve taken the first steps in learning a foundational web development language. From understanding what is javascript is now better.
As you continue, consider exploring advanced topics such as asynchronous programming (promises, async/await), APIs (AJAX, Fetch), and popular frameworks like React or Vue.
0 notes
Text
Backend Web Development Using Node.js

Node.js has revolutionized web development by enabling developers to write server-side code using JavaScript. If you're already comfortable with JavaScript on the frontend, transitioning to backend development with Node.js is a logical next step. In this post, we'll introduce the fundamentals of backend development using Node.js and how to build scalable, efficient web applications.
What is Node.js?
Node.js is a JavaScript runtime built on Chrome’s V8 engine. It allows developers to use JavaScript to write backend code, run scripts outside the browser, and build powerful network applications. Node.js is known for its non-blocking, event-driven architecture, making it highly efficient for I/O-heavy applications.
Why Use Node.js for Backend Development?
JavaScript Everywhere: Use a single language for both frontend and backend.
Asynchronous and Non-blocking: Great for handling many connections at once.
Vast Ecosystem: Thousands of modules available via npm (Node Package Manager).
Scalability: Ideal for microservices and real-time applications like chats or games.
Setting Up a Node.js Project
Install Node.js from nodejs.org
Create a new project folder:
Initialize the project:
Create your main file:
Basic Server Example
const http = require('http'); const server = http.createServer((req, res) => { res.writeHead(200, {'Content-Type': 'text/plain'}); res.end('Hello, Node.js Backend!'); }); server.listen(3000, () => { console.log('Server running on http://localhost:3000'); });
Using Express.js for Easier Development
Express.js is a popular web framework for Node.js that simplifies routing and middleware management.npm install express const express = require('express'); const app = express(); app.get('/', (req, res) => { res.send('Welcome to the Node.js backend!'); }); app.listen(3000, () => { console.log('Express server running on http://localhost:3000'); });
Common Backend Tasks with Node.js
Handle routing and API endpoints
Connect to databases (MongoDB, PostgreSQL, etc.)
Manage user authentication and sessions
Process form data and JSON
Serve static files
Popular Libraries and Tools
Express.js: Web framework
Mongoose: MongoDB object modeling
dotenv: Environment variable management
JWT: JSON Web Tokens for authentication
Nodemon: Auto-restart server on code changes
Best Practices
Use environment variables for sensitive data
Structure your project using MVC or service-based architecture
Use middleware for error handling and logging
Validate and sanitize user input
Secure your APIs with authentication and rate-limiting
Conclusion
Node.js is a powerful and flexible choice for backend development. Its ability to use JavaScript on the server-side, combined with a rich ecosystem of libraries, makes it ideal for building modern web applications. Start small, experiment with Express, and gradually add more features to build robust backend services.
0 notes
Text
How to Optimize Website Speed for SEO & Better UX
Introduction
Website speed is a crucial factor in determining search engine rankings and user experience. A slow website leads to poor engagement, high bounce rates, and lower conversions. Google has officially recognized page speed as a ranking factor, making it essential for businesses to optimize their website’s performance. In this article, we will explore effective strategies to improve your website speed for better SEO and user experience.
1. Why Website Speed Matters for SEO & UX
SEO Impact
Google’s search algorithms prioritize websites that load quickly, providing a better user experience. If your website is slow, search engines may rank your pages lower, reducing your organic traffic. Key SEO benefits of faster websites include:
Higher rankings on search engine results pages (SERPs)
Improved crawlability for search engines
Increased mobile-friendliness, crucial after Google’s mobile-first indexing update
User Experience (UX) Impact
Website visitors expect pages to load quickly. If a site takes more than three seconds to load, over 50% of users will abandon it. Faster websites offer:
Higher user engagement and session duration
Lower bounce rates
Improved conversions and revenue generation
2. How to Measure Website Speed
Before making improvements, analyze your website’s speed using tools such as:
Google PageSpeed Insights (https://pagespeed.web.dev/)
GTmetrix (https://gtmetrix.com/)
Lighthouse (Chrome DevTools) (https://developers.google.com/web/tools/lighthouse)
These tools assess key performance indicators such as Largest Contentful Paint (LCP), First Input Delay (FID), and Cumulative Layout Shift (CLS).
3. Best Practices to Improve Website Speed
A. Optimize Images
Compress images using tools like TinyPNG or ImageOptim.
Use next-gen image formats like WebP instead of JPEG/PNG.
Implement lazy loading to defer image loading until they are needed.
B. Enable Browser Caching
Store frequently accessed resources in a user’s browser cache to speed up repeat visits.
Set expiration dates for static files (CSS, JavaScript, images) using .htaccess settings.
C. Minimize HTTP Requests
Reduce the number of elements on a page (scripts, images, CSS files).
Combine multiple CSS and JavaScript files into a single file.
D. Use a Content Delivery Network (CDN)
A CDN distributes your website’s content across multiple global servers, reducing latency and speeding up load times for users in different locations. Popular CDN providers include:
Cloudflare
Amazon CloudFront
Akamai
E. Optimize Server Response Time
Choose a reliable and high-performance web hosting provider.
Use caching plugins for CMS platforms like WordPress (e.g., WP Rocket, W3 Total Cache).
Optimize your database by removing unnecessary data and post revisions.
F. Reduce JavaScript & CSS Blocking
Minify JavaScript and CSS files using tools like UglifyJS and CSSNano.
Implement asynchronous loading (async or defer attributes) to prevent render-blocking.
G. Implement Lazy Loading
Lazy loading ensures that images and videos load only when they appear on the user’s screen, significantly improving initial page load speed. This can be implemented with:<img src="image.jpg" loading="lazy" alt="Example image">
4. Mobile Speed Optimization
With Google’s mobile-first indexing, optimizing for mobile users is crucial. Key steps include:
Using Accelerated Mobile Pages (AMP) for faster rendering.
Optimizing for responsive design and reducing unnecessary elements on mobile.
Testing mobile performance using Google’s Mobile-Friendly Test (https://search.google.com/test/mobile-friendly).
5. Final Thoughts
Website speed optimization is no longer optional—it is a necessity for better SEO rankings and improved user experience. By implementing these strategies, businesses can enhance performance, increase traffic, and drive higher conversions. Regularly monitor and improve your website’s speed to stay ahead of the competition.
Contact Us for SEO Assistance
Need help optimizing your website speed? Contact our expert team today!
📞 Mobile: +91 9655877577 🌐 Website: https://intellimindz.com/seo-training-in-tirupur/
0 notes
Text
Speed Optimization Strategies Used by Website Maintenance Company India

Website speed plays a critical role in user experience, search engine rankings, and overall business success. A slow-loading site can lead to high bounce rates, decreased conversions, and lower SEO performance. This is why businesses seek the expertise of a website maintenance company in India to implement effective speed optimization strategies. In this blog, we'll explore the key techniques these companies use to enhance website performance.
Why Website Speed Optimization Matters
Before diving into strategies, let's understand why website speed is crucial:
Improved User Experience: Faster websites offer better navigation and engagement.
Higher Search Engine Rankings: Google prioritizes fast-loading websites.
Increased Conversions: Studies show that even a one-second delay can reduce conversions by 7%.
Lower Bounce Rates: Users are more likely to stay and explore a fast, responsive site.
Website Maintenance Company India employs cutting-edge tools and techniques to optimize speed while ensuring long-term performance.
Key Speed Optimization Strategies
1. Image Optimization
Images significantly impact page load time. Website Maintenance Services India uses various methods to optimize images without compromising quality.
Techniques Used:
Compressing images with tools like TinyPNG and ImageOptim
Implementing next-gen formats like WebP
Using responsive images with adaptive sizing for different devices
Pro Tip: Properly optimized images can reduce load time by up to 40%.
2. Caching Techniques
Caching stores frequently accessed resources to minimize server response time.
Caching Strategies:
Browser Caching: Stores static files like images and CSS for repeat visitors.
Server-Side Caching: Reduces server load by serving pre-generated content.
CDN Caching: Distributes content across global servers for faster access.
Did You Know? A reliable website maintenance company often integrates advanced caching solutions like WP Rocket and LiteSpeed Cache.
3. Content Delivery Network (CDN) Integration
A CDN distributes website content across multiple servers worldwide, ensuring users access the site from the nearest server.
CDN Benefits:
Reduces latency by minimizing the physical distance between the user and server
Balances traffic loads to prevent server overload
Enhances website security with DDoS protection
Popular CDNs: Cloudflare, Akamai, and StackPath are frequently implemented by website maintenance companies.
4. Minimizing HTTP Requests
Every element on a webpage (e.g., images, scripts, and stylesheets) requires an HTTP request. Reducing these requests significantly speeds up loading times.
Optimization Techniques:
Combining CSS and JavaScript files
Using CSS sprites to consolidate multiple images
Removing unnecessary plugins and scripts
Expert Insight: Streamlining website resources can decrease load time by 20% or more.
5. Implementing Lazy Loading
Lazy loading defers the loading of non-essential content (e.g., images and videos) until the user scrolls to it.
Advantages:
Reduces initial page load time
Conserves bandwidth
Enhances performance on content-heavy websites
Tools Used: WordPress plugins like a3 Lazy Load and WP Rocket simplify lazy loading implementation.
6. Database Optimization
Over time, website databases accumulate unnecessary data, slowing down performance. Wordpress Maintenance Service regularly cleans and optimises databases.
Optimization Steps:
Deleting expired transients and spam comments
Removing redundant post revisions
Optimizing database tables using tools like WP-Optimize
Pro Tip: Scheduled database cleanups ensure consistent performance.
7. Code Optimization
Clean, efficient code directly impacts website speed.
Best Practices:
Minifying CSS, JavaScript, and HTML files
Eliminating render-blocking resources
Adopting asynchronous loading for scripts
Insight: Experienced Indian developers use tools like Autoptimize and UglifyJS to streamline code for maximum efficiency.
Why Choose a Website Maintenance Company in India for Speed Optimization?
India has become a hub for high-quality, cost-effective website maintenance services. Companies here combine technical expertise with innovative strategies to deliver outstanding performance improvements.
Key Advantages:
Cost-Effective Solutions: Competitive pricing without compromising quality.
Advanced Tools and Techniques: Access to the latest performance optimization tools.
Global Expertise: Extensive experience working with international clients.
Ongoing Support: Regular performance monitoring and proactive maintenance.
Conclusion
Website speed is a critical factor in ensuring a positive user experience, better SEO rankings, and higher conversion rates. Partnering with a professional website maintenance company India gives businesses access to advanced speed optimization strategies that keep their websites running smoothly. If you're looking to enhance your site's performance, consider consulting with experts who can tailor solutions to meet your business needs.
#websitemaintenanceservicesindia#websitemaintenancecompanyindia#wordpresswebsitemaintenanceservices#wordpresswebsitemaintenancecompany#wordpressmaintenanceservice#wordpressmanagementservices
0 notes
Text
BrainyDX: Your Partner in Core Web Vitals Optimization & Website Success

In today’s digital world, where everyone expects things instantly, having a fast website that’s easy to use is no longer optional – it’s critical. Here’s where Core Web Vitals (CWV) can make a big difference for your website’s visitors. Understanding and optimizing these metrics is crucial for any website owner or SEO professional in 2024.
Core Web Vitals Explained
Core Web Vitals, created by Google, are 3 important measurements that track how users experience your website in the real world. They focus on how fast your site loads(Loading Speed), how quickly it responds to clicks(Responsiveness), and how stable the layout is(visual stability). By making sure your website performs well in these areas, you can create a frustration-free experience for your web visitors, which can ultimately lead to a higher ranking in search results. Also, it can provide you with more conversions.
The Three CWV Metrics
There are currently three core web vitals that Google prioritizes:
Largest Contentful Paint: This metric measures how long it takes for the major content on your webpage (usually text content or images) to become fully visible to the user. According to Google, for a positive user experience, your website’s LCP should load in under 2.5 seconds.
Interaction to Next Paint: Introduced in March 2024, It replaces First Input Delay (FID) and measures how responsive your website feels to user interactions like clicking buttons or typing in forms. An INP of under 100 milliseconds is considered ideal.
Cumulative Layout Shift: This metric measures how often unexpected layout shifts occur on your webpage, which will be really frustrating for users. A low CLS score (ideally below 0.1) indicates a stable visual experience.
Why Core Web Vitals Matter in 2024
There are several compelling reasons why CWV are more important in 2024:
SEO Ranking Factor: Google has explicitly stated that Core Web Vitals are a ranking factor in their search algorithms. Strong CWVs can boost your website’s ranking in search results, bringing in more visitors naturally.
Improved User Experience: A fast, responsive, and visually stable website provides a significantly better user experience. This translates into higher engagement, lower bounce rates, and ultimately, more conversions.
Mobile-First Indexing: When Google ranks websites in search results, they mainly look at the mobile version of your site for indexing. Because most mobile users expect websites to load quickly and work smoothly, optimizing CWV is essential for ranking well in mobile search results.
Enhanced Brand Reputation: A website that performs well technically reflects positively on your brand image. Visitors perceive a fast and user-friendly website as trustworthy and reliable.
Website Optimisation for CWV
You can use the following important strategies to strengthen your Core Website Vitals:
Image Optimization: The loading speed of your website might be considerably slowed down by large image files. Optimise image dimensions for the web and use image compression technologies.
Reduce Render-Blocking Resources: Files such as CSS and JavaScript can prevent the content on your website from rendering. Think about applying strategies like code splitting, postponing non-essential resources, and minifying.g.
Make Use of Browser Caching: Caching enables browsers to save webpage components locally, saving them from having to be downloaded again on different visits. Implement effective browser caching strategies for static content.
Prioritize Critical Rendering Path: Determine the important resources to render the web page’s initial content and make sure they load first.
Minimize HTTP Requests: To optimize website loading speed, external resource requests should be minimized. Additionally, whenever feasible, file consolidation techniques can be employed to further reduce overall HTTP requests.
Utilize Content Delivery Network: A CDN essentially creates a global network of servers for your website’s content. This brings your content closer to users around the world, reducing delays (latency) and ensuring faster loading times regardless of their location.
Measuring and Monitoring CWV
We have several free tools available to help you assess and track Core Web Vitals. These tools are most popular in 2024:
Google Search Console: This is a tool by Google that provides insights into your website’s health. It includes a dedicated Core Web Vitals report that shows you how your website is performing over time. This report highlights any areas where your website might need improvement and helps you prioritize what to focus on first.
PageSpeed Insights: Another free tool from Google, PageSpeed Insights analyzes your website’s overall performance and provides specific recommendations for improvement. We’ll use advanced industry technology to assess your website and thoroughly identify opportunities for improvement.
Lighthouse: This is a free, open-source auditing tool developed by Google. It conducts a comprehensive assessment of your website’s functionality, including a detailed analysis of CWV. Lighthouse provides you with scores for each metric and suggests specific ways to improve them.
By using these tools regularly, you can get insights of your website’s performance and can find areas where Core Web Vitals optimization can make a positive impact.
Conclusion
In today’s competitive online landscape, website optimization for CWV is no longer optional. By prioritizing these key metrics, you can ensure a smooth, frustration-free experience for your visitors, which ultimately leads to better SEO performance, higher conversions, and a stronger overall online presence.
How We Can Help You Optimize Core Web Vitals
Here at BrainyDX Technologies, we are experts in website optimization and SEO. Our team can help you:
Analyze Core Web Vitals: We’ll use advanced industry tools to analyze your website performance and find ways to make it even better.
Develop a CWV optimization strategy: We will create a customized plan to address your specific website’s needs and ensure your CWVs meet Google’s recommendations.
Implement optimization techniques: We can make the technical adjustments needed to improve overall speed of your website, make it react faster to clicks, and ensure everything stays in place when it loads.
Monitor and track progress: We’ll regularly check website performance and keep you updated with reports to help it keep thriving.
We can improve your website’s speed, user experience, and search ranking? We offer a free consultation to discuss Core Web Vitals and how it can help you achieve your SEO goals.
#corewebvitals#cwv#digitalmarketing#websiteoptimization#seo#webdev#webperformance#googleranking#userexperience
1 note
·
View note
Text
When it comes to web development, things are always changing. New frameworks and libraries are constantly popping up, each trying to be the best. It can be tough to decide which one to use, especially when you have between NextJS vs ReactJS, top contenders.
Let’s take a closer look at the pros and cons of each technology to help you make the best choice for your website with Inwizards, Leading Software Development Company.
NextJS vs ReactJS: A Detailed Overview
A. NextJS: The All-in-One Powerhouse
Picture a powerful framework created specifically for ReactJS that simplifies development and provides a wide range of built-in features. This is where NextJS works its magic. It enables developers to build fast and efficient web applications with outstanding user experiences (UX).
Server-Side Rendering (SSR) and Static Site Generation (SSG): NextJS is great for improving website visibility on search engines and loading pages quickly. It can dynamically generate content on the server or create fast-loading static HTML files. This adaptability is beneficial for a wide range of projects.
Built-in Routing and Data Fetching: Gone are the days of piecing together routing and data fetching solutions. NextJS elegantly handles these critical aspects, allowing you to focus on building the core functionalities of your application.
Image Optimization: Images are often the silent culprits of slow websites. NextJS offers automatic image optimization, ensuring your visuals load efficiently without compromising quality.
Project Structure and Conventions: NextJS enhances code maintainability and streamlines development for teams by offering a definitive project structure and conventions.
Know Why Use ReactJS for Web Development? Read More
B. ReactJS: The Building Block Maestro
When comparing ReactJS and NextJS, it’s important to note that they serve different purposes. While NextJS is a full-fledged framework, ReactJS is a JavaScript library that is focused on creating user interfaces. Its component-based structure allows for great flexibility and versatility in development.
Components: Reusable Building Blocks: React applications are composed of reusable components, each representing a distinct portion of the UI. This modularity promotes code organisation, maintainability, and easier collaboration.
JSX (JavaScript XML): JSX is a syntax extension that allows you to write HTML-like structures directly within your JavaScript code. This makes for a more intuitive and efficient way to define components.
Virtual DOM: React’s virtual DOM plays a crucial role in optimising UI updates. It creates an in-memory representation of the UI, allowing React to efficiently identify changes and update only the necessary parts of the real DOM, resulting in smooth and performant UIs.
Looking for ReactJS Development Services? Consult Inwizards Software Technology
NextJS vs ReactJS Choosing the Right Tool
Now, let’s explore when each technology shines:
A. When to Embrace the Power of NextJS
SEO-Critical Websites and Landing Pages: The power of SSR and SSG makes NextJS an excellent choice for websites that need to rank highly in search engines. Initial content is readily available to search engine crawlers, boosting SEO.
Performance-Focused Applications: Whether it’s a dynamic e-commerce platform or a data-heavy dashboard, NextJS ‘s ability to optimize performance through SSR, SSG, and image optimization is a game-changer. Users will experience fast loading times and a seamless browsing experience.
Projects Requiring Built-in Functionalities: NextJS takes care of routing, data fetching, and other common development tasks, allowing you to focus on the core logic and business functionality of your application.
B. When ReactJS Takes the Stage
Complex, Single-Page Applications (SPAs): ReactJS excels in building interactive SPAs. Its flexible component-based architecture allows you to create intricate UIs that feel responsive and dynamic.
Fine-Grained Control over Project Structure: ReactJS doesn’t enforce a specific project structure. This flexibility gives you more control over how you organize your codebase, which can be beneficial for experienced developers or projects with unique requirements.
Existing Familiarity with Vanilla JavaScript or Other Front-End Libraries: If you or your team have a strong foundation in vanilla JavaScript or other front-end libraries like Angular, the transition to ReactJS might be smoother.
Confused Between ReactJS vs React Native? Check key Differences
Learning Curve and Community Support
Both NextJS and ReactJS boast vibrant communities, offering extensive resources and support for developers of all levels. However, there are some differences in the learning curve:
NextJS: Because NextJS builds upon ReactJS , having a solid understanding of React concepts is essential to effectively leverage NextJS’s features. If you’re new to both, expect a slightly steeper initial learning curve. However, the benefits of NextJS’s built-in functionalities and conventions can significantly reduce development time in the long run.
ReactJS: With its focus on core UI building blocks, ReactJS offers a more gradual learning curve. You can start with the fundamentals and progressively build your knowledge as your projects become more complex. However, for larger projects, managing the structure and integrating additional libraries for functionalities like routing or data fetching can require more effort.]
The online communities for both technologies are highly active and supportive. You’ll find a wealth of tutorials, documentation, forums, and Stack Overflow threads to answer your questions and guide your learning journey.
Want to Know Is it good to use Django and React together in 2024? Learn More
Conclusion: The Champion Lies in Your Project’s Needs
The battle between NextJS and ReactJS isn’t about which one is inherently “better.” It’s about identifying the champion that best suits your project’s specific requirements. Here’s a quick recap:
Choose NextJS if:
SEO and initial load times are paramount.
You need a high-performance web application.
You value built-in functionalities and a streamlined development experience.
Choose ReactJS if:
You’re building a complex, interactive SPA.
You need fine-grained control over project structure.
Your team has a strong foundation in vanilla JavaScript or other front-end libraries.
Ultimately, the best way to choose is to experiment with both technologies. Many developers find that NextJS is a fantastic choice for rapidly building modern web applications, while ReactJS offers the flexibility for highly customized and interactive UIs.
0 notes
Text
WordPress: Eliminate Render-Blocking Resources for a Faster Website
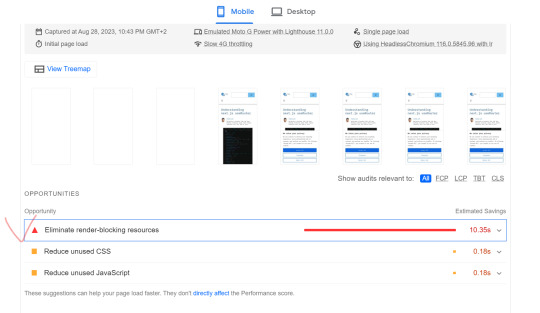
In today's fast-paced digital world, a slow website can be a major turn-off for visitors. It's not just user experience that's at stake – search engines like Google also consider website speed as a ranking factor. One common issue that can slow down your WordPress website is render-blocking resources. In this article, we'll delve into what render-blocking resources are, why they matter, and most importantly, how to eliminate them to ensure your WordPress website performs at its best.
Originhttps://worldgoit.com/archives/posts/software-development/wordpress-eliminate-render-blocking-resources-for-a-faster-website/
Table of Contents
- Introduction - Understanding Render-Blocking Resources - Impact on Website Performance - Identifying Render-Blocking Resources - Best Practices for Elimination - 1. Asynchronous Loading - 2. Deferred JavaScript - 3. Browser Caching - 4. Content Delivery Networks (CDNs) - 5. Minification and Compression - 6. Prioritize Above-the-Fold Content - 7. Modern Web Development Tools - Implementing Solutions Step-by-Step - Conclusion - FAQs
Introduction
When a user visits your WordPress website, their browser needs to load various resources like HTML, CSS, and JavaScript. Render-blocking resources are JavaScript and CSS files that prevent the page from loading until they are fully processed. This can significantly slow down the rendering of your web page, leading to a poor user experience.
Understanding Render-Blocking Resources
Render-blocking resources act as roadblocks for your website's rendering process. Browsers pause rendering to fetch and process these resources, delaying the display of the page content. JavaScript files, especially those placed in the header, are major culprits. CSS files can also impact rendering if not handled properly.
Impact on Website Performance
Website speed matters more than ever in a world where attention spans are shrinking. Studies show that visitors tend to abandon sites that take more than a couple of seconds to load. Additionally, search engines consider page speed as a ranking factor, meaning slower websites might rank lower in search results.
Identifying Render-Blocking Resources
To tackle this issue, you must first identify which resources are causing the delay. There are various online tools and plugins available that can analyze your website and provide a list of render-blocking resources. This step is crucial in understanding what needs to be optimized.
Best Practices for Elimination
1. Asynchronous Loading By loading resources asynchronously, you allow the browser to continue rendering the page while fetching the resources in the background. This can greatly improve the perceived loading speed. 2. Deferred JavaScript Deferring JavaScript means postponing its execution until after the initial rendering. This prevents JavaScript from blocking other resources and speeds up the page load. Recommendation Plugin and Youtube Async JavaScript Autoptimize https://youtu.be/ElpcjGBgTGk?si=ue1rvzQPs0YI971R 3. Browser Caching Leverage browser caching to store static resources locally. Returning visitors will then have these resources cached, resulting in faster load times. 4. Content Delivery Networks (CDNs) CDNs distribute your website's resources across multiple servers worldwide. This reduces the physical distance between the user and the server, leading to quicker resource retrieval. 5. Minification and Compression Minify your CSS and JavaScript files by removing unnecessary characters. Additionally, compressing these files reduces their size, making them quicker to load. 6. Prioritize Above-the-Fold Content Load essential resources first, especially those needed for above-the-fold content. This way, users can see and interact with the main content sooner. 7. Modern Web Development Tools Consider using modern build tools like Webpack or Rollup. These tools can bundle and optimize your resources, reducing the number of requests made by the browser
Implementing Solutions Step-by-Step
- Start by analyzing your website's current performance using online tools. - Identify the specific resources causing the delay. - Update your WordPress theme and plugins to their latest versions. - Utilize asynchronous loading for non-essential resources. - Defer JavaScript where possible and optimize CSS delivery. - Leverage browser caching and consider a reliable CDN. - Minify and compress CSS and JavaScript files. - Prioritize above-the-fold content for faster initial rendering. - Explore modern web development tools for advanced optimization.
Conclusion
A fast-loading website is a key factor in retaining visitors and achieving higher search engine rankings. By understanding and addressing render-blocking resources, you can significantly improve your WordPress site's performance. Implementing the strategies mentioned in this article will help you create a smoother, more enjoyable user experience while boosting your website's SEO efforts.
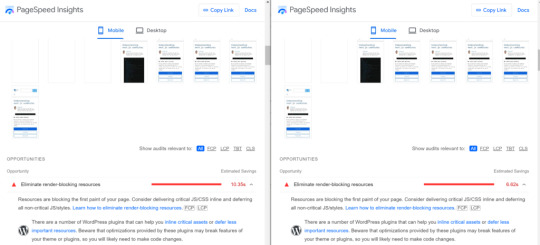
before after
FAQs
Q1: What are render-blocking resources? Render-blocking resources are JavaScript and CSS files that prevent a webpage from rendering until they are fully loaded and processed. Q2: How do render-blocking resources affect my website? Render-blocking resources can slow down your website's loading speed, leading to a poor user experience and potentially lower search engine rankings. Q3: How can I identify render-blocking resources on my WordPress site? There are various online tools and plugins available that can analyze your website and provide a list of render-blocking resources. Q4: What is asynchronous loading? Asynchronous loading allows the browser to continue rendering a webpage while fetching resources in the background, improving perceived loading speed. Q5: Can using a Content Delivery Network (CDN) help with render-blocking resources? Yes, a CDN can distribute your website's resources across multiple servers, reducing the distance between the user and the server and speeding up resource retrieval. Read the full article
1 note
·
View note
Text
What, Why, and How Javascript Static Initialization Blocks?
#javascript#typescript#webdevelopment#reactjs#tutorial#coding#developer#development#programming#react#react.js#svelte#angular#softwaredeveloper#frontenddeveloper#frontend#class#Javascript Static Initialization#What Javascript Static Initialization Blocks#why Javascript Static Initialization Blocks#how Javascript Static Initialization Blocks#javascript tutorial#learn javascript#learn coding#learn programming#beginner#beginner guide
1 note
·
View note
Text
Why Should You Hire Node.js and ReactJS Developers for Your Company?
Web applications can be launched independently of the client's browser with the help of Node JS Services, a free and open-source runtime environment and framework that works on a wide variety of platforms. It was initially conceived for real-time, push-based architectures but is now widely used for non-blocking, event-driven services like static websites and back-end API applications. There is a different JS engine and node installed in each browser. Node JS was developed using the same V8 JavaScript engine that powers Google Chrome. Do you agree that it sounds a little complex? This implies that you can operate your whole site on a single "stack," simplifying development and maintenance so that you can concentrate on achieving the project's business objectives. Because of its open source nature, Node JS services and ReactJS services can be used without cost and are continually refined and enhanced by programmers all over the world.
In contrast to more conventional application software, Node.js is neither a library nor a framework but rather a runtime environment.The Web application programming interfaces (APIs) and the Java Script interpreter are both part of the runtime environment (RTE). As a result, it is small in size, adaptable, and simple to set up, all of which contribute to the application's efficiency and its development time.
There are many advantages to employing Node JS Services Developer
In short, your Node JS app development project will succeed like never before if the engineers you choose have the experience and dedication. In the long term, there will be several advantages for your firm. Let's look at a few of them.
The Creation of Application Programming Interfaces and Their Combination: You have the option of creating robust, individualised APIs for use in your mobile and web-based software. If you need assistance integrating a well-known API into your project, React JS services experts may be able to help.
The Future of Plugins: Node JS developers provide end-to-end plugin development services, meaning they can help with any aspect of a plugin's creation or maintenance.
The Art of User Interface and Experience Design: Developers skilled with Node JS may create apps with unique features for each user. Therefore, hiring the correct person(s) or team(s) may improve your company's ability to provide aesthetically pleasing UI/UX designs. You must get the best ReactJS services.
Making a Chatbot: The developers provide in-depth consultation services using Node JS to create chatbots that are easy for users to interact with. They assist you in using live chat technologies to provide an authentic human interaction and win over your intended audience.
Apps that allow for real-time communication: High-quality, cross-platform, and cross-device chat apps are possible with the aid of a Node JS services development team. You may cater to a wider audience and see your user base grow all at once.
Resources for Analysing Data: Hiring seasoned Node JS experts allows you to build and release effective data analysis products. Using this knowledge, you can build dynamic dashboards to display the most important business data. Hire an experienced developer to avail the best ReactJS services.
Specialised Migrator Support: Employing Node JS developers gives your business the breathing space it needs to stay up with the newest technology and move older programmes as needed. You can make your applications more flexible so they can adapt to new situations.
Repairs and upkeep: All aspects of creating a website or mobile app are assisted with. To prevent data corruption or incompatibility across apps, the designers provide top-tier upkeep services.
Why should front-end developers use ReactJS services?
The advantages of using React JS services are many. Let's look at the main advantages of React JS to discover why it's better than other front-end design techniques.
Speed: React essentially enables developers to use their application's components on both the client and server sides, which speeds up development time. To put it another way, the application's logic may be written by several developers without being affected by their modifications. Always aim to get the best ReactJS services for your company.
Flexibility: React's code is modular, making it more versatile and simpler to maintain than those of other frontend frameworks. As a result, organisations may save substantial money and time thanks to this adaptability.
Performance: With speed and efficiency in mind, React JS services were developed. The framework's backbone provides a server-side rendering component and a virtual DOM program, which allows for lightning-fast performance even in the most complicated of applications.
Usability: If you have a fundamental understanding of JavaScript, deploying React should be a breeze.
An experienced JavaScript programmer can master React technology in only a few days. If you’re looking to take advantage of nodeJS services and the best ReactJS services, SISGAIN is the company you should contact right away.
#Node JS Services#ReactJS Services#Best Reactjs Services#Get best Reactjs Services#best responsive web design company
1 note
·
View note
Text
Cardano & Ethereum (A Tale of the Tortoise and the Hare)
This past weekend I went on a short trip to Bend, OR to backpack with a friend of mine named Nick who introduced me to block-chain and crypto currency starting in 2015 or 2016. Our hike left plenty of time for talking about various technologies related to crypto but it wasn't long before we started into a disagreement about the 2 leaders in the Layer-2 crypto space, Cardano and Ethereum. On one hand I believe Cardano will provide the protocol & currency that is widely adopted throughout the world. Nick believes Ethereum will take this crown. As the conversation deepened, it became clear that our beliefs stemmed directly from the principles each company abides by, but that I did not truly understand the differences between these approaches. Needless to say, without an understanding of the differences in company philosophy, it's hard to know who could be the ultimate winner. The ramblings below serve to outline the core principles of each company and how these principles affect timelines for growth and feature-sets moving forward. I hope you enjoy and learn some things along the way as I know I have. Also, a thank you to Nick for constantly pushing my knowledge!
IOHK & The Cardano Foundation:
Started in 2015, Cardano was created following a dispute between Vitalik Buterin and Charles Hoskinson, both of whom helped Co-found Ethereum. The dispute was centered around the principles that would govern growth and scaling from a business standpoint for Ethereum moving forward. Charles believed in a for-profit model of development whereas Vitalik wanted to keep Ethereum open-source/non-profit. This dispute and separation from Ethereum meant that Charles and Cardano needed to start from the ground up and produce all assets and features of Cardano from within - no more reliance on an open-source community.

One of the primary pain points for a Layer 1 cryptocurrency is the lack of efficiency and scalability. Bitcoin is the poster child for these weaknesses, with Ethereum initially falling into this group as well (this has since changed for Ethereum but remained true until recent years). Large amounts of energy and computing resources are consumed to verify the transactions using a Proof-Of-Work protocol whereas Cardano implemented a Proof-Of-Stake mechanism from the get-go to alleviate these issues.
Another distinction that Cardano has is in the coding language it is built on, Haskell. Invented in 1990, Haskell is a statically typed language designed to integrate well with mathematical formulas and algorithms as well as providing extremely high degrees of reliability and security within the language itself. Considered a purely "functional" language, Haskell functions are designed to run with essentially no chance of unintended side-effects elsewhere in code. This is a crucial point in it's comparison to Ethereum, whose coding language Solidity is more akin to JavaScript which has no such feature (or limitation depending on which camp you're in). I have started playing around with Haskell, and the basic gist is the language is built of tiny interconnected pieces of code that are effectively isolated, meaning one chunk of code can only run one way and cannot be modified without breaking the entire "process stack" of functions. Security and reliability are the name of the game here with an added benefit of efficiency.
These features are why I equate Cardano to the Tortoise in this fairy tale - they appear to be the "wise" cryptocurrency that learned from the large player's (Ethereum/Bitcoin) mistakes. So far, Cardano has released and supported the following features:
- Proof-Of-Stake using Ouroboros protocol
- Desktop and Mobile Crypto Wallet Clients
- Stake Pools and Decentralized Community
- Smart Contracts (apparently this release didn't go so well this September. I'll have a blog post discussing what happened. )
Being a Tortoise isn't all sunshine and rainbows however.
Cardano's funding, research, and verification model of development means that producing a working and vetted feature within the Cardano ecosystem can take a LONG time. IOHK and Cardano also gave up features and abilities that are retained within Ethereum including a faster pace of innovation, inherent full decentralization, and an arguably much lower bar to cross for users to develop on the Ethereum blockchain.

The Ethereum Foundation:
Ethereum is the brainchild of Vitalik Buterin, a Russian born developer and computer scientist. Vitalik first gained notoriety when the Bitcoin Whitepaper caught his attention in 2009/2010. Vitalik’s interest eventually pushed him to co-found the Bitcoin Magazine in 2011 where he continued to create posts about cryptocurrency and decentralized economics. During this time, Vitalik learned of the limitations of something like Bitcoin and understood that changes and features would need to be added if this were to scale appropriately. Starting in 2013, Vitalik began writing his own Whitepaper for a new currency, Ethereum. Ethereum was designed to fill holes in Bitcoin’s functionality while also allowing for increased involvement from outside developers - hence the eventual creation of the Ethereum Foundation in 2014.

The Ethereum Foundation describes itself as the following:
“The EF is not a company, or even a traditional non-profit. Their role is not to control or lead Ethereum, nor are they the only organization that funds critical development of Ethereum-related technologies. The EF is one part of a much larger ecosystem.”
In other words, development work is not done directly by developers hired by Ethereum, but rather grants and funding/resources are given to those who simply work within the Ethereum ecosystem. This open-source style of development means that many more people are working on the Ethereum blockchain at a given time in comparison to Cardano, but that work might not be synced together. Changes to the blockchain and features are rapid meaning “cool stuff” can be made quickly and easily. The link below shows the the myriad of ways you can get involved with Ethereum and contribute to it’s development:
https://ethereum.org/en/community/
This is where my personal hesitation on Ethereum comes in. When I visit that site as a business, I have no idea who to contact or what central agency can help me implement Ethereum into my business. It’s up to me to know how I want to implement the blockchain into my business and up to me to find developers from there. Cardano on the other hand, has a handy link and a physical address helping to establish a physical presence similar to what companies are used to dealing with now. The link below illustrates this.
https://iohk.io/en/contact-commercial
Working in IT, there are governing bodies and agencies which set protocol standards to support security and reliability of hardware and software. Without these organizing bodies, technology in Enterprise environments would be the “wild west” and invariably efficiency & reliability would go down. These standards are why I can reliably connect an HDMI cable to any HDMI port and it “just works”. By structuring a foundation like Ethereum has, I worry that development work might get disorganized or be a source of frustration for a typical business to implement. On the other hand, Cardano and IOHK are unbearably slow to develop and implement so it has it’s own downsides.
Regardless of all of these facts, I can’t say reliably where either of these will go in the future which is why I hold both currencies. Maybe Ethereum is too ahead of it’s time and Cardano is stuck in the past? Maybe there is a middle ground that someone will snatch up? I hope you learned as much as I did in this post....This is not meant to advise investment decisions but merely to provide context for the vision of these companies (or foundations). Let me know your thoughts in comments below or on Twitter!
0 notes
Text
A Step-By-Step Process for Turning Designs Into Code
css-tricks.com
Turning website design files into a combination of HTML, CSS and JavaScript is the bread and butter of many front-end web development jobs, but there’s a part of this work that doesn’t neatly fit in to tutorials on any specific topic. There’s a process of breaking down a design and figuring out how to approach the build that seems to fall under on-the-job training for new front-end developers. It’s not something taught alongside core technologies (no matter where we are learning those technologies—college, bootcamp, or on our own).
In this post, we’ll take a look at how to go from design to code, and why you might want to follow a process like this instead of just diving into code head-first—which, let’s face it, we love to do! The contents of this post are based on my experiences onboarding new developers, the kinds of conversations we’ve had, and the help and feedback I’ve provided in those situations.
One reason the process of moving from design to code is a core professional skill for a front-end developer is that without having some way to dig in and predict how you will approach something, it’s very difficult to provide an estimate for how long it takes to make or what questions you might need answered before you start. Many designs might appear simple at first glance, but quickly become complex once you get into the weeds. I’ve seen this lead to overpromises, which often leads to tighter deadlines, stress and even worse side effects. Suddenly everything takes much longer than we initially thought. Yuck. Let’s see if we can avoid that.
Evaluating a design
As a way to talk about this, let’s use an example design for a “marketing-style” web page and assume we have been asked to implement it. We can also assume this site is created in a context where marketing professionals may come in and edit the content via some content management system (CMS), re-order the sections, replace images, and make style changes. So we need to decide on the components of the page that will be the building blocks used in the CMS.
This gets at another reason that this can be missed in education: often in our own solo projects, we can have static content right there in the HTML, and component parts aren’t going to be Frankenstein-ed together by strangers to form whole new pages and sections. But once you step into more real-world dev situations, things are a lot more dynamic, and we are often working at the layer of “make things that a non-developer can use to make a web page.”
Let’s use this website for a clinical trial is example. As we can see there are a lot of familiar design elements. Marketing sites tend to share common patterns:
a big hero section
product images
small separate sections of short-form content emphasizing one thing or another
information about the company
etc.
On mobile, we can take it as a given that in each section, the left columns will stack on top of the right, and some other fairly typical reflow will happen. Nothing structural will change on mobile. So what we are looking at is the core of the design.
In this example, there is a header, then a lot of distinct sections, and a footer. At a glance, some of the sections look kind of similar—several have a two-column layout, for example. There are button and heading styles that seem to be consistent throughout. As soon as you take a look at something like this, your eye will start to notice repeated patterns like that.
This is where we start making notes. Before we do any coding, let’s understand the ideas contained in the design. These ideas can fall into a few buckets, and we want our final product—the web page itself—to correctly represent all these ideas. Here are the buckets I commonly use:
Layout-level patterns—repeating layout ideas and the overall grid
Element-level patterns—headings, text sizes, fonts, spacing, icons, button sizes
Color palette
Structural ideas—the logical organization of sections, independent from the layout
Everything else—ideas that are only present in one component
Documenting the patterns this way comes in handy for figuring out our CSS approach, but also for choosing what HTML elements to use and starting conversations with the designer or other stakeholders if something is unclear. If you have access to the source files for the design, sections and layers might be labelled in there that give you a good idea what the designer was thinking. This can be helpful when you want to talk about specific sections.
So let’s look at the ideas contained in our example design. We’re going to do several passes through the design, and in all of them, we’re going outside-in, top-to-bottom, and left-to-right to ensure we evaluate every element. In each of the five passes, we’re looking for stuff that goes into just one of the buckets.
We’re unconcerned with getting this list perfect; it can always be changed later—we just want to record our first impressions.
Pass 1: Layout-level ideas
In this design we have a few layout ideas that stand out right off the bat.
A header with a horizontal nav section
A main content column within the content area—left and right edges align within all sections from header to footer
Sections with two columns
Sections with a single centered column
Sections with a single left-aligned column
A footer with three columns
Fairly generous padding inside each section
First impressions
We should note any other first impressions we have during this first pass, good or bad. We can never have a first impression twice, and some of our gut reactions and questions can be forgotten if we neglect noting them now. Plus, identifying specific stuff that you like in the design can be nice when we get to talking with the designer. It both helps to celebrate the good stuff and mix it in with other constructive criticism.
Our first impressions might be things like:
👍 The design is clean-looking and readable.
👍 The sections are all titled by questions (good, helps draw reader in and gives each section a clear purpose).
🤨 Question marks are used inconsistently in the titles (possibly just an oversight?).
🙋♀️ Sometimes there are very similar font sizes right next to each other (may need to follow up to see if this is intentional because it seems a less slick and professional than the rest of the site).
👍 The logo is nice with that little gradient going on.
Pass 2: Element-level ideas
Here are things we might notice in this second pass:
Primary (blue) and Secondary (white) button styles, plus a “Learn more” button in the header with a little arrow (an expanding menu maybe?)
Heading and sub-heading styles
Three “body text” sizes (16px, 18px, 20px)
A “dark-mode” section where text color is white and the background is dark
A consistent presentation of “image & caption” sets
Custom bullet points of various kinds
Inline links in the text are underlined and, other links, like those in the footer, are not.
A repeated card component with an icon on top, and a heading and a list inside the card
The logo repeats a few times in different contexts/sizes.
The footer contains uppercase headings that don’t appear elsewhere.
Pass 3: Color palette
There is not too much going on in this design color-wise.
blue/purple primary color
light/dark body text colors
light/dark link colors
nice gradient under the word “hope” in the logo
light gray background color
dark navy background color
specific red and green “checkmark” and “stop” icon colors
Some design tools let you export the color hex values used in the design file, or even full-on Sass or CSS variable declarations. If you have that option, use it. Otherwise, find your own way to grab those values and name them because those are the foundation for lots of our initial CSS work.
Throughout our CSS and other code, we want to be refer to colors with labels or classes like “primary” and “secondary” that we can reuse throughout the code. This makes it easier to adjust values in the future, and to add themes down the line if we ever need to.
Pass 4: Structural ideas
This is where we might actually name the regions of the page in ways that make sense to us, and identify the hierarchy of the content. We can start to understand the accessibility needs of our implementation by documenting in plain language what we see as the nature and structure of the content in the page. As always, going outside-in, top-to bottom, left-to-right as we make our evaluations.
Focusing on structure helps us figure out the underlying patterns that eventually become our components, and also helps us understand the way we want people who use assistive technology to perceive the content. In turn, that guides us as far as what HTML elements we need to use to write semantic HTML. Semantic HTML speaks to the nature and structure of the content so that it can be perceived correctly by browsers. Browsers use our HTML to create the accessibility tree that assistive tech, like screen readers, uses to present the page. They need a strong outline for that to succeed and semantic HTML provides that solid structure.
This means we need to understand the nature of what’s on the page well enough that we could explain it verbally with no visual support if we had to. From that understanding, we can work backwards to figure out the correct HTML that expresses this understanding via the accessibility tree, which can be inspected in you browser’s developer tools.
Here’s a quick example of the accessibility tree in Chrome if everything on the page is a div, and if elements are correctly chosen to match the nature of the content. Determining the best element choice in a given situation is outside the scope of this post, but suffice it to say that the expressive, non-”generic generic generic” accessibility tree below is entirely created with HTML elements and attributes, and makes the content and its organization much easier for somebody to perceive using assistive technology.
So, in this fourth pass, here are notes we might make:
Top-level structure:
Header
Main Content
Footer
Not so bad for the first top-to-bottom pass. Let’s go a level deeper. We’re still unconcerned with the child inside elements of the sections themselves yet—we want just enough info to label the top level items inside each sections.
Within Header there is:
Within Main Content there is:
Within Footer there is:
Home link
Navigation section
Hero section
Short explainer about the disease itself
Explainer about the treatment
Intro to the trial
Explainer with more details about the trial
Statement about who can join the study
Call-to-action to participate
Short explainer about the company
Logo
Summary Sentence
Some lists of links with titles
Divider
Copyright notice
This pass reveals a few things. First, the Header and Footer sections are pretty shallow and are already revealing raw elements like links and text. Second, the Main section has eight distinct subsections, each with its own topic.
We’re going to do one more pass here and get at some of the deeper details in those sections.
Header home link—Woohoo, it’s just a link and we’re done.
Header nav—This is an expanding hover nav that needs JavaScript to work correctly. There are probably lots of accessible examples to follow, but still will take more time to develop and test than if we were working with raw links.
Hero
Disease Explainer
Treatment Explainer
Trial—Intro
Trial—More Details
“Who Can Join” statement
Call-to-Action
About the Company
Title
Column 1
Column 2
Subtitle (we missed this in the first element-level pass)
Paragraph
Primary button link
Secondary button link
Hero image
Title
Paragraph
Unordered list
Large text
Unordered list
Image and caption (figure and figcaption)
List of links
Title
Column 1
Column 2
Paragraphs
Image and caption (figure and figcaption)
Title
Column 1
Column 2
YouTube Video Player
Paragraphs
Title
Subtitle
Cards (with Icon, Title, and List)
Title
Column 1
Column 2
Paragraph
Unordered list
Paragraph
Unordered list
Title
Paragraph
Secondary button link
Title
Paragraph
Yowza, that got long fast! But now we understand pretty well the kinds of things we need to build, and what parts might be tricky. We also see that there may be some helper components to be built that aren’t quite represented by any one of these sections, for example, a two-column layout component that stacks to one column on mobile and has a title on top, or a generic “section container” component that takes a background and foreground color and provides the right styles plus standardized internal padding.
Incidentally, with this breakdown we’ve done a pretty good job expressing the final accessibility tree we want our HTML to create, so we are well on our way to having the implementation be a smooth experience without a lot of re-work to get accessibility right.
Pass 5: Everything else
What are some other ideas contained in this design, things that stick out, or challenges we notice? Maybe not much, but this is kind of the other side of the “first impressions” notes. Now our heads are filled with context for what it is in the design.
If something stands out now, especially if it’s a question about how something works, capture it. An example is, “Hmm, what is the ‘Learn More’ link in the nav supposed to do?” The answer might be: “It’s a list of links to each section that open when you hover there.” Every now and then, a designer expects that this kind of thing is already implied in the design, even if it is not explicitly documented, and it only comes up at the design review stage after that thing is developed—which is often too late to correct without affecting dates and deadlines.
We should also now look deeply and identify any hidden “glue work”— things like getting our styles in order, handling mobile, configuring the CMS, adding and testing authoring options and arrangements for our building blocks, and adding automated tests. Stuff like that.
At this point, we are ready to nail down exactly what components can be created in the CMS. Maybe we already have some of the basic setup done in the current system from past work. Whatever the case, we have enough to draw on to offer a decent estimate of the work needed, grouped into categories. For example, we might categorize components that:
are already 100% ready (no dev time needed),
exist but need tweaks for this new purpose (predictable dev time needed),
are totally new, but the path is obvious and safe (predictable dev time needed),
are totally new and need some research to implement. Or the design is unclear, or something about it gives you the heebie-jeebies and you need to have discussions with stakeholders. The earlier you can spot this, the better. Talk it over with whoever is running the project.
Now we have enough information to make a reasonable estimate. And more to the point, we’ve reduced the total time the project will take, and limited the trouble we might have along the way, because we’ve gained several advantages from planning it out.
The advantages of having a process
The exact steps we take and what order they are completed in is not the main point. What matters most is understanding the kind of information you need to gather when starting on a project. You might have your own ideas about how the work is done and in what order, whatever works for you is great.
Here are the advantages I’ve realized when assessing a design with a process in mind, compared to just kinda diving in, “getting stuff working,” and handling things as they come up.
As much as we’d like every project to arrive fully formed and perfectly ready to start, in reality, designs often contain assumptions that might be impractical to implement, or contradict something else we care about, like accessibility. In that case, you can assess the whole thing up front and get the conversations started with people who can resolve those issues early in the process. This can happen while you dive into the pieces that are ready to code, and will stop you from bumping into these roadblocks later when you are about to build that part of it. Flagging concerns early is definitely appreciated by the people who need to solve them.
You can be helped by others
Without a plan, it can be difficult to understand how far along you are in completing the project, as well as knowing if you need help meeting a deadline. Even if you do need help and are able to ask for it, it’s tough to use extra helping hands effectively without the work being broken out in to separate little chunks that be easily divided. When you have a plan that makes sense, you can quickly delegate certain tickets, knowing that the jigsaw pieces will fit together in the end.
It’s easy (and common) for a new developer to think think that huge workloads and working around the clock is a good thing. But as you mature in the role, you’ll see that having a deep understanding of the whole picture of a project, or even a single ticket, is more valuable, while creating a better impression that you are “on top of things.” Recognizing early that a timeline doesn’t look right gives you options about how to address it in ways other than trying to be a hero and throwing some weekends at it.
Component architecture flows better
Architectural decisions are the worst for me. Naming components, figuring out where stuff should live, which components need to talk to each other, where to break stuff up into smaller components. A lot of those choices only make sense when we look at the bigger picture and think about all various ways that certain elements might be used by visitors and content creators. And a lot of these choices are marginal—choosing the “best” option between two acceptable solutions can be a huge time suck or completely subjective.
Have a process helps with that because you are going to get all, or most, of the information you need about the designs before digging deeply into the development work. For me, figuring out what pieces I need to make, and figuring out the best possible code to make those pieces, are two different things. Sometimes what I need is not the thing that comes most naturally from the code. And sometimes, after learning a bit about what is needed, I can avoid time spent bikeshedding marginal decisions because it’s more clear which decisions truly don’t matter.
You still learn new things as you write the code, of course, but you’re now better prepared to handle those things when they pop up. You even have a good idea about the kinds of that might present themselves.
Styles make more sense
As you plan the work, you can truly figure out which styles are global, which are section-specific, which are or component-specific, and which are one-off exceptions. If you don’t already have a system you like for this, Andy Bell’s Cube CSS pairs very well with the kind of breakdown I’m talking about. Here’s a video of Andy working through an example with Chris Coyier that you can check out for more about this approach.
Accessibility starts early in the process
This one is huge for me. By really understanding the ideas contained in the design, you will have an easier time picking semantic HTML elements and finding appropriate accessible patterns to build out what you see there. Accessibility can work its way into the daily work you do, rather than an afterthought or extra burden. Our perspective becomes that high-quality front-end code correctly expresses the nature and structure of its content to all users, and accessibility is how we measure that.
After a pretty short period, you’ll see how often designs conform to one known pattern or another, and the flow of breaking something down into known patterns to implement will speed up dramatically. Carie Fisher nicely sums up ideas related to this “Accessibility-first” approach.
Wrapping up
Like I said at the start, a lot of this falls under on-the-job training, the “oral tradition” of web development. It’s the kind of stuff you might hear from a senior developer on your team as you’re getting started in your first front-end role. I’m sure lots of people would have different priorities than I do and recommend a slightly different process. I also know for sure that a lot of folks out there work in situations without a solid process in place, and no one senior to consult.
If you are in that situation, or not yet in your first role, I hope this gives you a baseline you can relate to when you think about how to do the job. Ideally the job is not just diving in and putting stuff in divs until things look “right” but that is often our mode of operation. We are eager to make progress and see results.
I’m very grateful that I did have somebody working with me at my first development job who showed me how to split up pieces of a design and estimate work for large, long-term projects. That’s what inspired me to start thinking about this and—as I began supervising other developers and teams—thinking about how I wanted to adapt the process and make it my own. I also realized it wasn’t something I’d noticed people talking much about when teaching technical skills about using a particular language. So thanks, Nate!
Thanks also to Drew Clements and Nerando Johnson for providing early feedback on this post. You are the best.
0 notes
Text
Why do you expect Native reactions for your mobile app?
Like many others, I was initially cynical about Facebook and the response to Instagram. Initial demonstrations of the
JavaScript
language extension of React, JSX, made many developers uncomfortable. We had been working for years to differentiate HTML and JavaScript, but it seemed that Respond merged them. Some have challenged the need for another library on the client side, in an ocean full of them.
React
has proven incredibly popular, as it turns out, both on my own projects and with many others across the world, including major companies like Netflix. And now the platform has been put onto the mobile with React Local. React Native is a great choice to create powerful iOS and Android apps that feel at home on their respective platforms, all while building on any previous experience in web development. React Overview
Described as "A JavaScript library to create user interfaces" by its developers, React focuses on the display portion of your application. More concretely, this means that when you write a React Native app, your view code will consist of writing React components, which are tiny pieces of code explaining how a portion of your app will look based on some collection of input data. Let's look at a small component of example that can be used to show a simple button. (I omit styles, for clarity's sake.)
This Button part has two pieces of input data: onPress, which is a callback function for when pressing the button; and text, which is the string to be displayed within the button. The XML-like structure that the render function returns is called JSX, which is syntactic sugar for calls to the function Respond. And TouchableOpacity and Text are existing components included with Native React. Now that this Button feature has been developed, with consistent actions and styling, it can be used several times in the application.
Though this is a simple example, it shows how a piece by piece Respond app is designed. Continuing in this way, you can build components which reflect that abstraction layers. You can, for example, build a ButtonGroup component that contains several buttons connected to it. And building on that, you can write components which represent whole screens. Also as the device grows considerably larger, components at each stage remain understandable and manageably sized. Truly Native
Most JavaScript-based mobile apps use Cordova, or a framework that's based on it, like the common Ionic or Sencha Touch. You're able to make calls to native APIs with Cordova, but the majority of your software will be HTML and JavaScript within a WebView. Although you can approximate native components – and you can definitely create a great UI with HTML and JS – there's no Cordova app that matches the look and feel of a real native app. The little things-such as acceleration scrolling, keyboard actions, and navigation-all add up and can create unpleasant interactions for your customers when they're not behaving as planned.
While you still write JavaScript with React Native, the components you create end up rendering as native widgets on the platform. If you're familiar with Reacting to the Net, you'll feel at home. And if you've written apps in Java or Objective-C you can know several of the components of React Native instantly.
The best feature of react when it was initially released for the web was to render the view layer of your device a pure state production. As a developer, this means that you simply decide what your view will look like based on input data, instead of making imperative adjustments to view components (for example, programmatically modifying the text or color of a button by calling a function on it), and Respond smartly makes the adjustments for you when the state changes.
This change in thought could make building UIs dramatically simpler. We've all used apps where the UI reaches a weird unintended state after taking a direction the creator wasn't looking for. With Respond, these bugs are much easier to monitor. You don't have to care as much about the user's journey through the device as you do, instead concentrate on making sure that your view statements can accommodate all possible shapes for the state of your app. That's a lot easier problem to tackle-and check for. The machine also understands it more quickly, and changes to the static analysis and type systems would only make it easier to spot such glitches.
Native component definitions look and function pretty much like web component reaction, but target native UI widgets instead of HTML. So you can use a < View > instead of using a < div > (which is converted to a native UIView on iOS, and on Ios, android.view). As data changes for your components, React Native will determine what needs to be modified in your view, and will make the required calls to whatever native UI widgets are displayed.
And it is fast! JavaScript isn't as fast as native code can be, but JavaScript and Respond Native are more than able to keep the device running at 60 frames per second for most of the tasks. Under the hood, the JavaScript code runs on its own thread, separate from the thread of the main UI. So even though your device runs a complex logic, your UI can still animate or scroll at 60fps smoothly, as long as the JS thread doesn't block the UI.
Many software frameworks promise to let you make a great Android and iOS device, but the product always ends up somewhere in the middle without feeling very native to either one. By supporting the native platforms but also allowing the app to share much of its codebase between platforms, React Native allows developers to create amazing native apps that their customers would love, without the increase in budget building that might require two separate apps. EASILY UNDERSTANDABLE
Some of the biggest benefits of React is how open it is to even those who are unfamiliar with it. Most frameworks allow you to study a long list of terms that are only useful within that context, while ignoring the basics of the language. Reacting does its very best to do the opposite. Take the difference between rendering a portion of a friends list in React Native vs Ionic (AngularJS) as an example. With Ionic, you use the command ngRepeat. Let's assume we have an array of friends with the following fields each: first name, last name and is online. Yet we just want to view those friends who are online right now. Here's our checker:
our view:
This code snippet poses some immediate concerns if you aren't familiar with Ionic / AngularJS. What's the$scope? Which is Filter Syntax? And how can I add more behaviour, like sorting the friends list? With Respond Native, using the built-in filter and map functions, you make use of your existing language fundamentals awareness.
Although the React Native snippet still poses some concerns (What does React.createClass do? What is rendering?), the fact that the majority of the code here is just standard JavaScript means that beginners can find it more accessible and tenable. As an experienced developer, you'll save time using standard language features you already learn, and make your code more accessible to other developers. Perhaps just as importantly, React acts as an outstanding teaching resource if you are less familiar with JavaScript. Whether you haven't learned how to use maps or filters yet, practicing React will also teach you these. NgRepeat instruction just teaches you ngRepeat.
And this is before considering mobile production on multiplatforms. While in a React Native project, which targets both iOS and Android, there will be some pieces of platform-specific code, the majority will be shared and a JavaScript developer will understand all this. Vibrant Ecosystem
Since most of your React Native code is just plain JavaScript, it reaps the advantages of all language advances and their ecosystem. Instead of waiting for all the array manipulation functions you want to enforce on your System developers, why not just use lodash? Only use Moment.js to control or show the dates and times. And all those beautiful new features of the ES6 language you've been waiting for to try out? React is not only a perfect match, their use is encouraged!
Some libraries are especially suitable for use with React Native, thanks to its declarative views. One that I would be remiss in not considering is redux. Described as a "predictable state container," redux is a great library to control the state of your application. Redux is highly testable, and allows small functions to write which are clear about what data they modify. If that way your state changes are written, your app can take advantage of powerful features, such as global undo / redo and hot reload. Conclusion
I had a lot of fun learning and developing with React Native, between the ease of creation, the quality of the apps developed with it, and the richness of the platform and ecosystem.
As a reputed Software Solutions Developer we have expertise in providing dedicated remote and outsourced technical resources for software services at very nominal cost. Besides experts in full stacks We also build web solutions, mobile apps and work on system integration, performance enhancement, cloud migrations and big data analytics. Don’t hesitate to
get in touch with us!
#b2b website#b2b market research companies#b2b ecommerce b2b content marketing b2b seo b2b market research companies b2bservices Ecommerce#b2b ecommerce b2b content marketing b2b market research companies b2b seo b2bservices Ecommerce
0 notes
Text
Why do you expect Native reactions for your mobile app?
Like many others, I was initially cynical about Facebook and the response to Instagram. Initial demonstrations of the JavaScript language extension of React, JSX, made many developers uncomfortable. We had been working for years to differentiate HTML and JavaScript, but it seemed that Respond merged them. Some have challenged the need for another library on the client side, in an ocean full of them.React has proven incredibly popular, as it turns out, both on my own projects and with many others across the world, including major companies like Netflix. And now the platform has been put onto the mobile with React Local.
React
Native is a great choice to create powerful iOS and Android apps that feel at home on their respective platforms, all while building on any previous experience in web development. React OverviewDescribed as "A JavaScript library to create user interfaces" by its developers, React focuses on the display portion of your application. More concretely, this means that when you write a React Native app, your view code will consist of writing React components, which are tiny pieces of code explaining how a portion of your app will look based on some collection of input data. Let's look at a small component of example that can be used to show a simple button. (I omit styles, for clarity's sake.)
This Button part has two pieces of input data: onPress, which is a callback function for when pressing the button; and text, which is the string to be displayed within the button. The XML-like structure that the render function returns is called JSX, which is syntactic sugar for calls to the function Respond. And TouchableOpacity and Text are existing components included with Native React. Now that this Button feature has been developed, with consistent actions and styling, it can be used several times in the application.Though this is a simple example, it shows how a piece by piece Respond app is designed. Continuing in this way, you can build components which reflect that abstraction layers. You can, for example, build a ButtonGroup component that contains several buttons connected to it. And building on that, you can write components which represent whole screens. Also as the device grows considerably larger, components at each stage remain understandable and manageably sized. Truly NativeMost JavaScript-based mobile apps use Cordova, or a framework that's based on it, like the common Ionic or Sencha Touch. You're able to make calls to native APIs with Cordova, but the majority of your software will be HTML and JavaScript within a WebView. Although you can approximate native components – and you can definitely create a great UI with HTML and JS – there's no Cordova app that matches the look and feel of a real native app. The little things-such as acceleration scrolling, keyboard actions, and navigation-all add up and can create unpleasant interactions for your customers when they're not behaving as planned.While you still write JavaScript with React Native, the components you create end up rendering as native widgets on the platform. If you're familiar with Reacting to the Net, you'll feel at home. And if you've written apps in Java or Objective-C you can know several of the components of React Native instantly.The best feature of react when it was initially released for the web was to render the view layer of your device a pure state production. As a developer, this means that you simply decide what your view will look like based on input data, instead of making imperative adjustments to view components (for example, programmatically modifying the text or color of a button by calling a function on it), and Respond smartly makes the adjustments for you when the state changes.This change in thought could make building UIs dramatically simpler. We've all used apps where the UI reaches a weird unintended state after taking a direction the creator wasn't looking for. With Respond, these bugs are much easier to monitor. You don't have to care as much about the user's journey through the device as you do, instead concentrate on making sure that your view statements can accommodate all possible shapes for the state of your app. That's a lot easier problem to tackle-and check for. The machine also understands it more quickly, and changes to the static analysis and type systems would only make it easier to spot such glitches.Native component definitions look and function pretty much like web component reaction, but target native UI widgets instead of HTML. So you can use a < View > instead of using a < div > (which is converted to a native UIView on iOS, and on Ios, android.view). As data changes for your components, React Native will determine what needs to be modified in your view, and will make the required calls to whatever native UI widgets are displayed.And it is fast! JavaScript isn't as fast as native code can be, but JavaScript and Respond Native are more than able to keep the device running at 60 frames per second for most of the tasks. Under the hood, the JavaScript code runs on its own thread, separate from the thread of the main UI. So even though your device runs a complex logic, your UI can still animate or scroll at 60fps smoothly, as long as the JS thread doesn't block the UI.Many software frameworks promise to let you make a great Android and iOS device, but the product always ends up somewhere in the middle without feeling very native to either one. By supporting the native platforms but also allowing the app to share much of its codebase between platforms, React Native allows developers to create amazing native apps that their customers would love, without the increase in budget building that might require two separate apps. EASILY UNDERSTANDABLESome of the biggest benefits of React is how open it is to even those who are unfamiliar with it. Most frameworks allow you to study a long list of terms that are only useful within that context, while ignoring the basics of the language. Reacting does its very best to do the opposite. Take the difference between rendering a portion of a friends list in React Native vs Ionic (AngularJS) as an example. With Ionic, you use the command ngRepeat. Let's assume we have an array of friends with the following fields each: first name, last name and is online. Yet we just want to view those friends who are online right now. Here's our checker:
our view:
This code snippet poses some immediate concerns if you aren't familiar with Ionic / AngularJS. What's the$scope? Which is Filter Syntax? And how can I add more behaviour, like sorting the friends list? With Respond Native, using the built-in filter and map functions, you make use of your existing language fundamentals awareness.
Although the React Native snippet still poses some concerns (What does React.createClass do? What is rendering?), the fact that the majority of the code here is just standard JavaScript means that beginners can find it more accessible and tenable. As an experienced developer, you'll save time using standard language features you already learn, and make your code more accessible to other developers. Perhaps just as importantly, React acts as an outstanding teaching resource if you are less familiar with JavaScript. Whether you haven't learned how to use maps or filters yet, practicing React will also teach you these. NgRepeat instruction just teaches you ngRepeat.And this is before considering mobile production on multiplatforms. While in a React Native project, which targets both iOS and Android, there will be some pieces of platform-specific code, the majority will be shared and a JavaScript developer will understand all this. Vibrant EcosystemSince most of your React Native code is just plain JavaScript, it reaps the advantages of all language advances and their ecosystem. Instead of waiting for all the array manipulation functions you want to enforce on your System developers, why not just use lodash? Only use Moment.js to control or show the dates and times. And all those beautiful new features of the ES6 language you've been waiting for to try out? React is not only a perfect match, their use is encouraged!Some libraries are especially suitable for use with React Native, thanks to its declarative views. One that I would be remiss in not considering is redux. Described as a "predictable state container," redux is a great library to control the state of your application. Redux is highly testable, and allows small functions to write which are clear about what data they modify. If that way your state changes are written, your app can take advantage of powerful features, such as global undo / redo and hot reload. ConclusionI had a lot of fun learning and developing with React Native, between the ease of creation, the quality of the apps developed with it, and the richness of the platform and ecosystem.
As a reputed Software Solutions Developer we have expertise in providing dedicated remote and outsourced technical resources for software services at very nominal cost. Besides experts in full stacks We also build web solutions, mobile apps and work on system integration, performance enhancement, cloud migrations and big data analytics. Don’t hesitate to
get in touch with us!
#b2b ecommerce#b2b content marketing#b2b market research companies#b2b seo#Ecommerce#socialmediamarketing
0 notes
Text
45.99% Earnings Increase in 5 Months for a Digital Infoproduct [SEO Case Study]

You’re about to get the strategy behind one of the most challenging SEO campaigns my SEO agency has ever run.
Why was it so challenging? 3 reasons:
First, the niche is massively competitive: A make-money-online infoproduct in the financial niche. Nuff said.
Second, we only had 5-months to pull this off.
Third, just like any other client, they were extremely hungry for results and demanded quality work.
In the case study below, you’re going to learn the technical playbook, the onsite content strategy, and the link building techniques we carried out to get this 45.99% revenue growth win for this infoproduct business.
The Case Study
Our client takes advantage of the wide reach of the interwebs to teach his students how to earn money trading online. We’re talking currencies, forex, stock markets, crypto, etc.
The business’ revenue is generated solely through the sale of digital download products – in this case, trading guides in an ebook format and video trading courses.
When the owner of this profitable business (which already built some authority in the niche) approached The Search Initiative (TSI) about helping to grow their organic reach and find new students, we were excited to take on the challenge in one of the most competitive spaces there is.
There was also a catch – the campaign was planned for only 5 months, which sounded really scary in this case.
To accomplish this, the game plan was to focus hard on a quick-win strategy, while setting the stage for long term gains post-campaign.
Our strategists were certain that the value we could provide would have a considerable impact on his business’ bottom line.
How? Because…
By focusing on increasing organic traffic, we could improve sales, while allowing the client to pull back on ad spend.
Over the course of the campaign, our technically-focused SEO strategies were able to grow organic traffic by 23.46%.
But what did the best job for the client’s business was the 45.99% increase in the number of conversions comparing 1st vs last month of the campaign. Sales went up from just over 2,100 a month to 3,095 – this really bumped their monetization.
And we did it in time.
These gains were achieved within only 5 months of the client signing with TSI and our team starting the campaign.
Here’s how we did it…
The SEO Playbook for Infoproduct Websites
Phase 1: A Comprehensive Technical Audit
I’ve said this in every TSI case study we’ve published so far… and I simply cannot emphasize enough:
A comprehensive technical audit is the most crucial part of any SEO campaign.
So before you begin any campaign, always start with a full technical audit.
Starting with…
Page Speed
First, our technical SEO strategists started at the bottom of the client’s tech stack… and you should too.
This starts with you digging into the web server’s configuration, and running a series of tests to measure the site’s speed.
This enables you to ensure that the performance of the web server itself wasn’t causing a penalty or disadvantage on either desktop or mobile connections.
So, what tests we run?
PageSpeed Insights (PSI) – this should be everyone’s go-to tool and shouldn’t need an explanation.
In cases where transfer speeds or latency are too high, we advise you (and our clients) to consider migrating to faster servers, upgrading to better hosting or better yet, re-platforming to a CDN.
Luckily, most of the time, you can achieve most of the gains through WPRocket optimization, as was the case with this case study.
Your Golden WPRocket Settings
Cache → Enable caching for mobile devices
This option should always be on. It ensures that your mobile users are also having your site served cached.
Cache → Cache Lifespan
Set it depending on how often you update your site, but we find a sweet spot at around 2-7 days.
File Optimization → Basic Settings
Be careful with the first one – it may break things!
File Optimization → CSS Files
Again, this section is quite tricky and it may break things. My guys switch them on one-by-one and test if the site works fine after enabling each option.
Under Fallback critical CSS you should paste your Critical Path CSS which you can generate using CriticalCSS site.
File Optimization → Javascript
This section is the most likely to break things, so take extreme care enabling these options!!
Depending on your theme, you might be able to defer Javascript with the below:
Note that we had to use a Safe Mode for jQuery as, without this, our theme stopped working.
After playing with Javascript options, make sure you test your site thoroughly, including all contact forms, sliders, checkout, and user-related functionalities.
Media → LazyLoad
Preload → Preload
Preload → Prefetch DNS Requests
The URLs here hugely depend on your theme. Here, you should paste the domains of the external resources that your site is using.
Also, when you’re using Cloudflare – make sure to enable the Cloudflare Add-on in WPRocket.
Speaking of Cloudflare – the final push for our site’s performance we managed to get by using Cloudflare as the CDN provider (the client sells products worldwide).
GTMetrix
If you don’t want to use additional plugins (which I highly recommend), below is a .htaccess code I got from our resident genius and Director of SEO, Rad Paluszak – it’ll do the basic stuff like:
GZip compression
Deflate compression
Expires headers
Some cache control
So without any WordPress optimization plugins, this code added at the top of your .htaccess file, will slightly improve your PageSpeed Insights results:
Internal Redirects
You know how it goes – Google says that redirects don’t lose any link juice, but PageRank formula and tests state something different (there’s a scientific test run on 41 million .it websites that shows PageRank’s damping factor may vary).
Whichever it is, let’s take all necessary precautions in case there is a damping factor and redirects drop a % of their link juice.
Besides, not using internal redirects is just good housekeeping. Period.
As we investigated the configuration of the server, we discovered some misapplied internal redirects, which were very easily fixed but would have a considerable effect on SEO performance – a quick win.
You can test them with a simple tool httpstatus.io and see results for individual URLs:
But this would be a long way, right? So your best bet is to run a Sitebulb crawl and head over to the Redirects section of the crawl and look at Internal Redirected URLs:
There you will find a list of all internally redirected URLs that you should update and make to point at the last address in the redirect chain.
You might need to re-run the crawl multiple times to find all of them. Be relentless!
Google Index Management
Everyone knows that Google crawls and indexes websites. This is the bare foundation of how the search engine works.
It visits the sites, crawling from one link to the other. Does it repetitively to keep the index up-to-date, as well as incrementally, discovering new sites, content, and information.
Over time, crawling your site, Google sees its changes, learns structure and gets to deeper and deeper parts of it.
Google stores in their index everything it finds applicable to keep; everything considered useful enough for the users and Google itself.
However, sometimes it gets to the pages that you’d not want it to keep indexed. For example, pages that accidentally create issues like duplicate or thin content, stuff kept only for logged-in visitors, etc.
Google does its best to distinguish what it should and shouldn’t index, but it may sometimes get it wrong.
Now, this is where SEOs should come into play. We want to serve Google all the content on a silver platter, so it doesn’t need to algorithmically decide what to index.
We clean up what’s already indexed, but was not supposed to be. We also prevent pages from being indexed, as well as making sure that important pages are within reach of the crawlers.
I don’t see many sites that get this one right.
Why?
Most probably because it’s an ongoing job and site owners and SEOs just forget to perform it every month or so.
On the other hand, it’s also not so easy to identify index bloat.
With this campaign, to ensure that Google’s indexation of the site was optimal, we looked at these:
Site: Search
Google Search Console
In our case, we found 3 main areas that needed attention:
Indexed internal search
If you’re on a WordPress site – you have to pay attention to this one.
Most of WordPress websites offer a built-in search engine. And this search engine is usually using the same pattern: ?s={query}.
Bear in mind that ?s= is the default one for WordPress, but if your theme allows you to set this up yourself, you might end up having something else instead of the “s” param.
To check if this is also your problem, use this site: search operator
site:domain.com inurl:s=
If it comes back with any results, it means that your internal search pages are being indexed, you’re wasting Google’s crawl budget, and you want to block them.
For our client, we suggested implementing noindex tags.
If your SEO plugin doesn’t have the option to noindex search results (I know that Rankmath does, but can’t remember if Yoast offers it as I’ve been off Yoast for a long time now), you might alternatively add the following line to your robots.txt:
Disallow: *?s=*
Duplicate homepage
This is another fairly common issue in WordPress if you’re using a static page as your homepage.
You see, the CMS may generate the pagination on your homepage, even if you don’t really have it paginated.
Why does this happen? Well, usually when you have a section where you list some of your newest posts. Or (thank you WordPress!) when you used to have your homepage set up as “Latest Posts” and Google managed to index them.
This creates URLs like these:domain.com/page/12/ domain.com/page/2/ domain.com/page/7/ domain.com/page/{number}/
The problem is caused because Google sees different content on these pagination pages – of course, the articles on page 2, 3, x are different, so the paginated list changes.
If you don’t have enough of the other, non-listed content on your homepage, to convince Google that these pages are similar enough to obey canonical – you have a problem.
In this case, even if you have the correct canonical tags in place, but Google finds these pages to not be identical, it might choose to ignore the canonicals. And you end up having all this stuff in the index.
It’s worth a check if you have similar pages indexed – and you should definitely pay attention:
To find these, run another site: search:
site:domain.com/page
To solve this for our client, we set up the 301 redirects so all of these pagination pages were pointing back to the homepage and we also removed them from XML sitemap:
(If you’re wondering, this screenshot is from Rank Math, which is a great free Yoast alternative, but you can also use Redirection plugin for WordPress.)
Please note that if your homepage is set up as a blog page (see below screenshot), this is most likely NOT a problem!
Other unwanted indexed pages
In our case, we also found other pages that were indexed but shouldn’t be:
Old forum pages
Old template pages
Blog tags
Media pages (thanks again, Yoast…)
Each of them might be different in your case, so you might want to consult an agency or professional SEO.
For this client, we removed the pages and used a 410 Gone HTTP header to remove them from the index faster.
Protip: Site: search queries you need to know
site:domain.com
This one is your foundational search queries and allows you to go through the entirety of what Google has indexed under your domain.
I like to run a search like this and switch to 100 results per page, by adding a num=100 parameter on Google:
https://www.google.com/search?q=site:domain.com&num=100
Then, I just click through the SERPs and inspect what’s there.
Things that are the most common issues are:
Query strings
Login/Cart/Checkout
Pagination
Tags
Anything that surprises you 🙂
Note that it doesn’t work for big sites as Google will only show you a sample of URLs.
site:domain.com/{folder}
This is just an extension of the standard site: search and allows you to find everything in a folder.
For example, on a Shopify site, you can list all category pages by running this search:
site:domain.com/collections/
Moving on…
site:domain.com inurl:{part-of-the-URL}
I love this one. It allows you to list all pages that share a common part of the URL.
For example, let’s say you want to find all pages that have “guide” in the URL:
site:domain.com inurl:guide
Voila!
site:domain.com -inurl:{part-of-the-URL}
Did you notice the little minus sign here “-inurl”? This one allows you to list all URLs that do not contain a certain string in the URL.
Let’s say you want to list all pages that do not contain “blog” in the URL.
Here’s how you’d do it:
site:domain.com -inurl:blog
The combination: site:domain.com -inurl:{part-of-the-URL} inurl:{another-URL-pattern}
Get ready for a really serious tool now! This one is a combination of “inurl” and “-inurl” (not in URL) operators and allows you to list pages that have a specific string in the URL, while don’t have another part in it.
For example, if you want to list all pages that are guides on your site, but not the buying guides – here’s how:
site:domain.com inurl:guide -inurl:buying
Make sure not to use spaces between the “:” and the string!
Also, be careful with the queries where operators cancel each other out – Google won’t return any results for these!
There are plenty of other combinations and search operators, so if any of the above is new to you, you should definitely read more about them here:
Get Your Sitemap in Order
In this case study, the team ensured that the XML sitemap was configured correctly so that Google’s crawlers and indexation engine were able to fully understand the site’s structure and present it to their users accurately.
Run a crawl with Screaming Frog to ensure that no URLs that are noindexed or missing are added to the sitemap.
First, switch to “List Mode” in Screaming Frog. Then select Upload → Download XML Sitemap. Type in the URL and let it crawl.
There should be no other pages than only the ones returning a 200 status code.
If there are, just remove them from the sitemap!
Soft 404 Errors
Soft 404 is a URL that displays a page telling the user that the page does not exist, but it returns a 200 OK (Success) instead of a 4xx HTTP status code.
This can definitely be a big problem for your site because, when it occurs, Google will start selecting what it thinks is a 404 with incorrect (200) HTTP response code on its own and, let’s be honest, algorithm sometimes often gets it wrong!
So, you’re facing an issue that good pages, which you’d rather keep in the index, are being thrown out because Google thinks they’re 404s.
Why does it think so?
Most probably there are similarities between the genuinely good and Soft 404 pages.
Unfortunately, these similarities are not obvious and, when analyzed algorithmically, they can be mistakenly taken as anything common and silly: footer, sidebar, banner ads, or whatnot.
So let me give you an example – this is how my 404 page looks like:
It returns a correct 404 status code, so everything is fine:
Now, if it was returning a 200 code – it would’ve been a soft 404. Google would figure it out and it could all be fine.
But there’s a but.
Let’s say I had a page with just a little bit of content – like this made up one:
As you can see – it has a different content, but everything else is the same: header, sidebar, footer.
When you approach it as Google does – algorithmically, it might end up being very similar to the soft 404 page example above. In fact, Google may class it the same. And this is what you don’t want. You don’t want Google to decide for you.
My rule is – don’t allow Google to make any decisions for you!
Our job, as SEOs, is to make it ridiculously easy for Google to crawl and index your site. So don’t leave anything you don’t have to for the algorithm to figure out.
In this case, we had all 404 pages set up to 301 redirect back to the homepage. It’s a common practice, but occasionally a dangerous one.
Why would it be dangerous?
Because we’ve seen cases where Google would simply treat all 301 redirects to the homepage as Soft 404s. And when it does that, it might also start treating your homepage as a Soft 404 page, because all these Soft 404s are defaulting to your homepage, right?
And what does that mean?
No homepage.
And when there’s no homepage? No rankings!
But if you’re really unlucky, Google will think that if your homepage got removed (Soft 404’d and thrown out of index), your entire domain should go out the window! And it’ll go on and de-index everything.
Sounds harsh!? It does, but we’ve seen extreme cases like this, so it’s better to be safe than sorry.
So why were we comfortable doing it?
At TSI our approach to this is simple: 404s are a natural thing on the Internet!
Therefore, we only 301 redirect the important pages, where applicable. By important, I mean pages that have external or internal links and some history.
We leave 404s where its a legit page of content just removed from the site, but has no value anyways.
I know what you’re thinking: What about Excluded or Errors under Index Coverage in Google Search Console?
To put it simply, in this case – Nothing! Because 404s are normal. Google will report them in GSC, but that’s fine.
Fixing Facebook Pixel Issues
Most infoproduct businesses leverage Facebook retargetting, so if you have an infoproduct (or your client does) you need to consider the following issue.
This problem was quite tricky to find a solution to, but our crawls showed that spiders can follow a pixel image:
So as you can see (or not see, because most of it is blurred) above, crawlers were accessing pages like:
domain.com/“https:/www.facebook.com/tr?id={client’s FB ID}&ev=PageView&noscript=1”
The part in red shouldn’t be there. As you can imagine, this was the case for every single URL on the site. Not good!
We didn’t really know how this was possible or what caused it, but the plugin generating Facebook Pixel was doing it wrong…
The problem was the backslashes “escaping” single and double quotes in the Javascript code generating the pixel:
We retired the plugin and inserted the pixel code directly in the source code (header.php file).
Our tech SEO guys keep complaining that there’s a plugin for literally everything in WordPress. Even for the easiest and smallest things.
So maybe next time, when you’re thinking of installing a plugin do us and yourself a favor – think if it’s really needed.
Don’t use plugins where they’re simply an overkill and the same can be accomplished faster and smoother by just a simple copy-paste.
Heading Structure
This was quite simple, but also an important one.
This site did not use any headings other than H2s… None. At all.
I mentioned the importance of semantic headings in another case study, so I’ll just say that the fix here was to simply organize them on every page and use all headings from H1 to H5.
Simple, but important.
HTTP pages and YMYL
Non-secure webpages are quickly going out of style.
The Electronic Frontier Foundation is aggressively promoting the movement of the secure HTTPS protocol being used across the entirety of the web.
Google is also supporting the idea through flagging of non-HTTPS content as “not secure” in Chrome.
This client did indeed have the correct SSL implementation in place, but there was a big problem.
The old HTTP pages were not redirected to their HTTPS versions.
Being in the YMYL (Your Money or Your Life) niche, you shouldn’t leave any loose ends.
I mean, you shouldn’t leave any loose ends at all, but when you’re in the YMYL niche specifically, you simply must not.
You could fix it with the use of Really Simple SSL plugin, which enables the HTTP→HTTPS redirects out of the box.
But as I said above, you don’t need WP plugins for every small action.
Here’s the .htaccess code we installed to have a proper HTTP to HTTPS and non-www to www redirect in place:
RewriteEngine OnRewriteCond %{HTTP_HOST} !^yourdomain.com [NC,OR]RewriteCond %{HTTP:X-Forwarded-Proto} =httpRewriteRule ^(.*)$ https://yourdomain.com/$1 [R=301,L]
Be careful, though! Make sure you have access to your FTP server before you click “Save” in the configuration.
In some cases, it might break things and to re-gain access to your site you’ll have to manually amend the contents of your .htaccess file.
All in all, this is what you wanna see if your preferred canonical domain is https://domain.com/:
Content Taxonomy & Internal Linking
In order to improve the internal linking of our client’s numerous blog posts, we recommended a re-organization of the site’s content categorization and taxonomy.
To start with, we suggested creating more categories in WordPress and adding them to the main menu.
This sounds simple, but prior to joining TSI, this site had only 1 big category (about 300 posts): Blog.
Moreover, to save the crawl budget, someone, unfortunately, noindexed all category and pagination pages.
When guys at TSI saw it, they were like this:
We created 16 new categories in WordPress – all corresponding with the type of course offered and the area of expertise it was teaching. We ensured that there were no more than 20 posts under each category.
See what I mean here? We’re all about them quick wins.
We also removed the noindex tags from the category pages.
The final trick was to add short, topically relevant text on top of each category page (above the posts), so Google would see them as more than just a list of articles. It meant more love from the G!
Kind of like what I’ve done here for my “SEO News” category page.
Through this, we created topical clusters (silos) under each category.
To create better topical relevance, you can also ensure that the articles would in most cases internally link only within the silo (article to article and article to its root category page).
This helps to better organize the content for the user’s benefit and also made it easier for crawlers to discover the pages.
The process built more internal links to the content, indicating its importance within the site’s information architecture.
A related posts content section was also added beneath each blog post, which amplified the same benefits, as well as providing the additional pros of helping users to find more of our client’s relevant educational content, also improving user metrics and click-through.
Stack those gains!
Phase 2: Creating a Winning Content Strategy
Once the server, site, taxonomy, and Google index were in advantageous positions, it was time to think about creating targeted content that both served the target demographic and would have the potential to rank for their most essential search terms.
Using Ahrefs, our technical team looked at competitor content for potential target keywords and studied metrics that indicated how difficult it would be to rank against them.
Trust me, once you have a list of keywords or topics you’re considering to go after, Ahrefs’ Keyword Explorer becomes very helpful:
And to find great keyword suggestions, from the Keyword Explorer you just need to go to Newly Discovered and you’re seeing all examples of new keywords related to your chosen one:
Another worthwhile option is Questions:
From there you can just pick keywords that appeal to you, taking into consideration their difficulty vs search volume.
But if you really want to up your content plan game, you have to check out the Content Explorer on Ahrefs:
It’s an extremely powerful tool, so I suggest you watch the below video to really take full advantage of it:
For our client, we estimated average monthly search volumes and considered the probable user intent behind each keyword vertical.
And speaking about the user intent – trust me, this is already a huge factor, but it will get even bigger in 2020.
If you would like to learn more about user intent, its types, and discovery, we had a great workshop during the Chiang Mai SEO conference this year. Here’s a video of one of TSI’s resident geniuses, Rad Paluszak, who held the presentation:
This content research process will give you the information needed to construct a strategy that focuses on creating content to serve users searching for the highest opportunity keywords.
Content Optimization & Keyword Cannibalization
The next task was to look at the existing pieces of content in 2 ways:
Run a keyword cannibalization audit.
I’ve talked about keyword cannibalization quite a bit in the past.
In fact, I think this is one of the most common, content-related on-site issues of this year.
It’s a plague on the industry, I tell you!
At TSI, we’re predicting that keyword cannibalization issues will become less of a problem with Google becoming smarter in natural language understanding (hint: Neural Matching and BERT), but it will probably remain as a hot topic and a big problem for years to come.
So in this case, we faced quite a serious case of keyword cannibalization. Out of around 300 articles indexed, 50 of them were double- or triple-ranking (cannibalizing) around positions 20-40. This was a strong suggestion that it needs to be solved.
This is just one of the keywords:
Since we are not experts in market trading and financial instruments, we had to ask the client for advice. We combined the list of all cannibalizing URLs and keywords, and supplied it to our client for a review.
When we received feedback regarding which pages can be merged, deleted or updated, the work began: We moved and combined the content.
And this is what you want to see:
In the meantime, we purged the pages that were not required and optimized (or deoptimized) the ones that were not preferable but had to stay within the site.
In doing so, we were able to increase the value of the existing content and get the most traffic possible from the client’s previous investment in the content.
Phase 3: An Authority Link Building Strategy
An essential part of any high-impact SEO campaign is the building of high-quality backlinks.
When this client joined us, we did the standard thing we do on every campaign, which you should do as well.
Perform a full audit on your backlink profile and you’ll likely find a mix of lower quality backlinks and some higher-quality inbound links too.
Immediately, some of the lowest quality backlinks were disavowed. You can read more about our approach to the backlink audit here.
Also, do an audit of your anchor text distribution.
In our case, we were slightly concerned about the anchor text distribution having too many exact match, partial match and compound (related to keywords, but not necessarily including the keywords directly – examples of these would be questions, sentence-long anchors, etc) anchors.
It looked like this:
And should look more like this:
With this in mind, during the first month of the campaign, we threw around 25 pillow links (we really propped up client’s social media accounts, created a few About Author pages on the publications he’s been contributing to and posted a few Medium articles) with branded anchors into the mix.
In the next 2 months, we also took a slightly safer approach to anchor texts in our outreach. This was all to balance things out.
Our outreach team began the process of reaching out to relevant sites who were pleased to place our client’s backlinks on their domains.
In the first month, the team negotiated and built 9 strong (DR 50+) outreach backlinks to the site and were able to negotiate 5-8 high-authority links each ongoing month.
Here are some link stats of our outreach job:
This quickly grew the domain’s authority, thus driving up rankings and improving discoverability on the web.
Here’s the link growth over the course of the campaign:
Results
Through completing our campaign using the techniques described in this case study, we were able to achieve considerable tangible growth for this client.
After 5 months of TSI working on the site, the client had enjoyed a 28% growth in the top 10 position rankings in Google, up from 1,713 positions to 2,188.
Stable growth is also shown in SEMRush:
This significantly increased the education business’ organic reach within just 5 months and translated into a 23.46% increase of sessions, an 18.46% increase in users and a 45.99% increase in earnings when comparing the 1st and 5th months of the campaign.
Comparing month-to-month with the previous year, with our help, the site reached a 252.78% increase in organic traffic and a 263.24% increase in goal completion.
The results of this campaign speak for themselves.
After 5 months of working with TSI, our client had seen a nice return on investment, and our proven strategies will continue to bear fruit as the business continues to develop in the long-term.
Conclusion
When a client puts their trust in you, you need to look at it from their perspective.
They’re trading their hard-earned cash for you work on their business, their baby.
With this particular case study, the pressure was on with a 5-month timeline in one of the hardest niches imaginable.
But by focusing on quick wins and optimizing what the client already had, results like this are achievable.
Let’s recap… remember to focus on:
Technical SEO first – Without a strong boat, you’re not going to sail anywhere. Don’t skip anything in the tech-SEO section above.
Content optimization and strategy – This is the area you want to bank on in the coming years.
Quality Backlinks – Focused on authority and balanced anchor distribution.
As long as you’re doing the right things: fixing everything, providing value and making the site easy for Google to understand – you’re going to win.
And if you need help, you know where to find us: The Search Initiative.
Get a Free Website Consultation from The Search Initiative:
[contact-form-7]
This content was originally published here.
0 notes
Photo

A new JS runtime, ESLint 7, npm's future, and more
#488 — May 15, 2020
Unsubscribe : Read on the Web
JavaScript Weekly
Deno 1.0 Released — Two years ago, Ryan Dahl, the creator of Node.js, gave a talk about the 10 things he regretted about Node.js. At the same time, he introduced Deno, a prototype of a new, security-first, npm-less JavaScript runtime — now it's considered ready for the big time and, at a minimum, is worth having a quick play with. If you want to do a walkthrough tutorial to see if it’s to your taste or not, this is a good one by Flavio Copes.
Ryan Dahl, Bert Belder, and Bartek Iwańczuk
Psst.. we launched Deno Weekly as a way to stay up to date with Deno. We'll only feature it from time to time in JavaScript Weekly.
JavaScript Features To Forget — It’d be easy to say.. that's just, like, your opinion, man.. but when it’s the author of about 73 (slight exaggeration) JavaScript books including JavaScript: The Definitive Guide, it’s worth listening.
David Flanagan
Don’t Build Auth From Scratch. Focus On Your App — Spend less time on authentication and authorization and more time developing your awesome app. Auth built for <devs>. Download our community edition for free.
FusionAuth sponsor
Playwright 1.0: Fast and Reliable Cross-Browser Testing — We first featured Playwright, Microsoft’s take on a cross-browser alternative to Puppeteer, a few months ago, but it’s already at 1.0. This post does a good job on selling it.
Arjun Attam (Microsoft)
Announcing TypeScript 3.9 — You know it's JavaScript plus syntax for type declarations and annotations by now, right? 3.9 gains a variety of editor improvements, performance improvements, and tweaks to inference and Promise.all. No awaited just yet though.
Daniel Rosenwasser (Microsoft)
Recoil: An Exprimental State Management Library for React — Interesting not only because it comes from Facebook, but because there’s a pretty good 23 minute talk about it and it follows the latest React standards.
Facebook
⚡️ Quick bytes:
WebAssembly is taking us into interesting places.. such as writing PONG clones in COBOL that we can play in the browser. The COBOL code is pretty nice, to be fair.
JSNation Live is the latest in a line of online JavaScript conferences, this one coming on June 18-19 and, curiously, with both free and paid options.
Kite has unveiled AI powered JavaScript 'completions' based upon deep learning over 22 million JavaScript files.
💻 Jobs
Senior Software Engineer — Save Lives & Make an Impact — We use Node/TS/React & ML to provide crisis support via SMS. Help us scale globally with a focus on privacy and security.
Crisis Text Line
Find a Job Through Vettery — Vettery specializes in tech roles and is completely free for job seekers. Create a profile to get started.
Vettery
📚 Tutorials and Opinions
▶ Tom Preston-Werner Talks About Redwood.js — GitHub co-founder Tom Preston-Werner talks about Redwood.js, a new full-stack JavaScript framework built around React, GraphQL, and Prisma.
Full Stack Radio podcast
Standard IO: Under the Hood — What really happens behind the scenes when you call console.log?
Vladimir Keleshev
An Initial Introduction to npm v7 — If you thought the npm blog would fade away after the GitHub acquisition, you thought wrong! Isaac Schlueter is back with a status update on what the next major version of npm will offer and is promising a series of posts to come going into more detail. We'll probably focus more on this in Node Weekly in coming weeks.
The npm Blog
Now Up to 4GB of Memory in WebAssembly Applications on V8 — It’s 4GB because WebAssembly currently uses 32 bit pointers but till now WebAssembly apps in Chrome and Emscripten have been limited to 2GB for.. reasons.
Andreas Haas, Jakob Kummerow, and Alon Zakai
Connect Users to Vital Business Data with NodeRun (Webinar On‑Demand)
Profound Logic sponsor
Why We Made a New Component Library Instead of Buying One — It principally came down to the company involved preferring to have total control but they also felt Vue.js was well suited to the task.
Alessandro Grosselle
Second-Guessing the Modern Web — What if everyone’s wrong? Can we solve things in a better way that single page applications? Interesting thought piece and Rich Harris replied with In Defense of the Modern Web.
Tom MacWright
John Conway's FRACTRAN, A Ridiculous, Yet Surprisingly Deep Language — A beautiful JavaScript-heavy tribute to John Conway (of Game of Life fame) by trying to reimplement his esoteric FRACTRAN language.
Reg Braithwaite
What Every Developer Should Know About TCP — You’re every developer! And so am I!
Roberto Vitillo
🔧 Code & Tools
ESLint v7.0.0 Released — The popular pluggable and configurable linter tool for identifying and reporting on patterns in your code. Node 8 support is dropped.
ESLint
A Much Faster Way to Debug Code Than with Breakpoints or console.log — Move forward and backwards through your code to understand what led to a specific bug, view runtime values, edit-and-continue, and more.
Wallaby.js sponsor
Next.js 9.4 Released: The React Powered Site Building Framework — Just two months after 9.3 (which was already an exciting release) comes the even more significant 9.4 which includes Fast Refresh, a new “instantaneous” hot reloading experience, plus incremental static generation where static pages can be generated or re-rendered in the background as traffic comes in.
Vercel
Fuse.js 6.0: Lightweight Fuzzy-Search Without Dependencies — Want a simple search feature without a dedicated backend? This could help. It’s been around for years but 6.0.0 has just dropped with more new goodies like logical query operators. - GitHub repo.
Kiro Risk
Perfume.js 5.0: A Web Performance Library for Measuring User-Centric Perf Metrics — Only 2KB when gzipped, supports the latest browser performance APIs for precise metrics on things like first paint, first input delay, total blocking time, etc.
Leonardo Zizzamia
Shifty: A Teeny Tiny Tweening Engine — All it does is tweening. It’s a low level animation solution that you can integrate into any rendering mechanism of your choice. The examples here demonstrate it well as it can be used for ‘animating’ things in an unconventional sense. GitHub repo.
Jeremy Kahn
MongoDB Is Easy. Now Make It Powerful. Free Download for 30 Days. — Using MongoDB Atlas? Studio 3T is the professional GUI and IDE that unlocks the power you need.
Studio 3T sponsor
Color2K: A Color Parsing and Manipulation Library in 2KB or Less — A key goal here was to be a lot smaller than the competition “while still satisfying all of your color manipulation needs in an sRGB space”.
Rico Kahler
by via JavaScript Weekly https://ift.tt/2WzGfUB
0 notes
Text
Alpine.js: The JavaScript Framework That’s Used Like jQuery, Written Like Vue, and Inspired by TailwindCSS
We have big JavaScript frameworks that tons of people already use and like, including React, Vue, Angular, and Svelte. Do we need another JavaScript library? Let’s take a look at Alpine.js and you can decide for yourself. Alpine.js is for developers who aren’t looking to build a single page application (SPA). It’s lightweight (~7kB gzipped) and designed to write markup-driven client-side JavaScript.
The syntax is borrowed from Vue and Angular directive. That means it will feel familiar if you’ve worked with those before. But, again, Alpine.js is not designed to build SPAs, but rather enhance your templates with a little bit of JavaScript.
For example, here’s an Alpine.js demo of an interactive “alert” component.
CodePen Embed Fallback
The alert message is two-way bound to the input using x-model="msg". The “level” of the alert message is set using a reactive level property. The alert displays when when both msg and level have a value.
It’s like a replacement for jQuery and JavaScript, but with declarative rendering
Alpine.js is a Vue template-flavored replacement for jQuery and vanilla JavaScript rather than a React/Vue/Svelte/WhateverFramework competitor.
Since Alpine.js is less than a year old, it can make assumptions about DOM APIs that jQuery cannot. Let’s briefly draw a comparison between the two.
Querying vs. binding
The bulk of jQuery’s size and features comes in the shape of a cross-browser compatibility layer over imperative DOM APIs — this is usually referred to as jQuery Core and sports features that can query the DOM and manipulate it.
The Alpine.js answer to jQuery core is a declarative way to bind data to the DOM using the x-bind attribute binding directive. It can be used to bind any attribute to reactive data on the Alpine.js component. Alpine.js, like its declarative view library contemporaries (React, Vue), provides x-ref as an escape hatch to directly access DOM elements from JavaScript component code when binding is not sufficient (eg. when integrating a third-party library that needs to be passed a DOM Node).
Handling events
jQuery also provides a way to handle, create and trigger events. Alpine.js provides the x-on directive and the $event magic value which allows JavaScript functions to handle events. To trigger (custom) events, Alpine.js provides the $dispatch magic property which is a thin wrapper over the browser’s Event and Dispatch Event APIs.
Effects
One of jQuery’s key features is its effects, or rather, it’s ability to write easy animations. Where we might use slideUp, slideDown, fadeIn, fadeOut properties in jQuery to create effects, Alpine.js provides a set of x-transition directives, which add and remove classes throughout the element’s transition. That’s largely inspired by the Vue Transition API.
Also, jQuery’s Ajax client has no prescriptive solution in Alpine.js, thanks to the Fetch API or taking advantage of a third party HTTP library (e.g. axios, ky, superagent).
Plugins
It’s also worth calling out jQuery plugins. There is no comparison to that (yet) in the Alpine.js ecosystem. Sharing Alpine.js components is relatively simple, usually requiring a simple case of copy and paste. The JavaScript in Alpine.js components are “just functions” and tend not to access Alpine.js itself, making them relatively straightforward to share by including them on different pages with a script tag. Any magic properties are added when Alpine initializes or is passed into bindings, like $event in x-on bindings.
There are currently no examples of Alpine.js extensions, although there are a few issues and pull requests to add “core” events that hook into Alpine.js from other libraries. There are also discussions happening about the ability to add custom directives. The stance from Alpine.js creator Caleb Porzio, seems to be basing API decisions on the Vue APIs, so I would expect that any future extension point would be inspired on what Vue.js provides.
Size
Alpine.js is lighter weight than jQuery, coming in at 21.9kB minified — 7.1kB gzipped — compared to jQuery at 87.6kB minified — 30.4kB minified and gzipped. Only 23% the size!
Most of that is likely due to the way Alpine.js focuses on providing a declarative API for the DOM (e.g. attribute binding, event listeners and transitions).
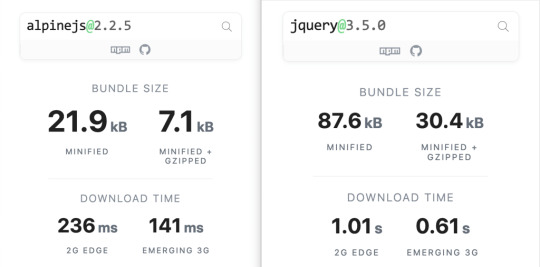
Bundlephobia breaks down the two
For the sake of comparison, Vue comes in at 63.5kB minified (22.8kB gzipped). How can Alpine.js come in lighter despite it’s API being equivalent Vue? Alpine.js does not implement a Virtual DOM. Instead, it directly mutates the DOM while exposing the same declarative API as Vue.
Let’s look at an example
Alpine is compact because since application code is declarative in nature, and is declared via templates. For example, here’s a Pokemon search page using Alpine.js:
CodePen Embed Fallback
This example shows how a component is set up using x-data and a function that returns the initial component data, methods, and x-init to run that function on load.
Bindings and event listeners in Alpine.js with a syntax that’s strikingly similar to Vue templates.
Alpine: x-bind:attribute="express" and x-on:eventName="expression", shorthand is :attribute="expression" and @eventName="expression" respectively
Vue: v-bind:attribute="express" and v-on:eventName="expression", shorthand is :attribute="expression" and @eventName="expression" respectively
Rendering lists is achieved with x-for on a template element and conditional rendering with x-if on a template element.
Notice that Alpine.js doesn’t provide a full templating language, so there’s no interpolation syntax (e.g. in Vue.js, Handlebars and AngularJS). Instead, binding dynamic content is done with the x-text and x-html directives (which map directly to underlying calls to Node.innerText and Node.innerHTML).
An equivalent example using jQuery is an exercise you’re welcome to take on, but the classic style includes several steps:
Imperatively bind to the button click using $('button').click(/* callback */).
Within this “click callback” get the input value from the DOM, then use it to call the API.
Once the call has completed, the DOM is updated with new nodes generated from the API response.
If you’re interested in a side by side comparison of the same code in jQuery and Alpine.js, Alex Justesen created the same character counter in jQuery and in Alpine.js.
Back in vogue: HTML-centric tools
Alpine.js takes inspiration from TailwindCSS. The Alpine.js introduction on the repository is as “Tailwind for JavaScript.”
Why is that important?
One of Tailwind’s selling points is that it “provides low-level utility classes that let you build completely custom designs without ever leaving your HTML.” That’s exactly what Alpine does. It works inside HTML so there is no need to work inside of JavaScript templates the way we would in Vue or React Many of the Alpine examples cited in the community don’t even use script tags at all!
Let’s look at one more example to drive the difference home. Here’s is an accessible navigation menu in Alpine.js that uses no script tags whatsoever.
CodePen Embed Fallback
This example leverages aria-labelledby and aria-controls outside of Alpine.js (with id references). Alpine.js makes sure the “toggle” element (which is a button), has an aria-expanded attribute that’s true when the navigation is expanded, and false when it’s collapsed. This aria-expanded binding is also applied to the menu itself and we show/hide the list of links in it by binding to hidden.
Being markup-centric means that Alpine.js and TailwindCSS examples are easy to share. All it takes is a copy-paste into HTML that is also running Alpine.js/TailwindCSS. No crazy directories full of templates that compile and render into HTML!
Since HTML is a fundamental building block of the web, it means that Alpine.js is ideal for augmenting server-rendered (Laravel, Rails, Django) or static sites (Hugo, Hexo, Jekyll). Integrating data with this sort of tooling can be a simple as outputting some JSON into the x-data="{}" binding. The affordance of passing some JSON from your backend/static site template straight into the Alpine.js component avoids building “yet another API endpoint” that simply serves a snippet of data required by a JavaScript widget.
Client-side without the build step
Alpine.js is designed to be used as a direct script include from a public CDN. Its developer experience is tailored for that. That’s why it makes for a great jQuery comparison and replacement: it’s dropped in and eliminates a build step.
While it’s not traditionally used this way, the bundled version of Vue can be linked up directly. Sarah Drasner has an excellent write-up showing examples of jQuery substituted with Vue. However, if you use Vue without a build step, you’re actively opting out of:
the Vue CLI
single file components
smaller/more optimized bundles
a strict CSP (Content Security Policy) since Vue inline templates evaluate expressions client-side
So, yes, while Vue boasts a buildless implementation, its developer experience is really depedent on the Vue CLI. That could be said about Create React App for React, and the Angular CLI. Going build-less strips those frameworks of their best qualities.
There you have it! Alpine.js is a modern, CDN-first library that brings declarative rendering for a small payload — all without the build step and templates that other frameworks require. The result is an HTML-centric approach that not only resembles a modern-day jQuery but is a great substitute for it as well.
If you’re looking for a jQuery replacement that’s not going to force you into a SPAs architecture, then give Alpine.js a go! Interested? You can find out more on Alpine.js Weekly, a free weekly roundup of Alpine.js news and articles.
The post Alpine.js: The JavaScript Framework That’s Used Like jQuery, Written Like Vue, and Inspired by TailwindCSS appeared first on CSS-Tricks.
via CSS-Tricks https://ift.tt/3aMMDvq
0 notes